Adding A Favicon To Your Website
The Favicon originated in 1999 with the introduction of Microsoft Internet Explorer 5. The word Favicon stands for ‘Favorite Icon’, and is a small icon assigned to a specific website or web page. If a website uses a Favicon, it’s usually displayed in the browser’s search box to the left of the web address. Web browsers, such as Firefox, display the Favicon in each of browser tab. Some browsers also support the use of Favicons in address bar drop down lists, links bars and drag to desktop features.
Originally, Favicons could only be created in a specific ICO file format. This format allowed for multiple icons in multiple sizes and a with variety of color settings all in one file. Modern day browsers, however, support other file formats in addition to the ICO format. Browsers such as MS Edge, Apple Safari, Chrome and Firefox can use PNG, GIF, and JPEG file formats.
Why Use a Favicon?
A Favicon is a good way to easily find their bookmarked websites as the eye will recognise a graphic icon faster than a line of text. Additionally, some web browsers specifically look for a Favicon when loading a web page. If the Favicon is not present a ‘404 Page Not Found’ type error message may be generated. Fortunately, such ‘404’ messages are found only in error logs and are not displayed back to the visitor. Including a Favicon will stop errors occurring in error logs and may improve your page loading times a little bit.
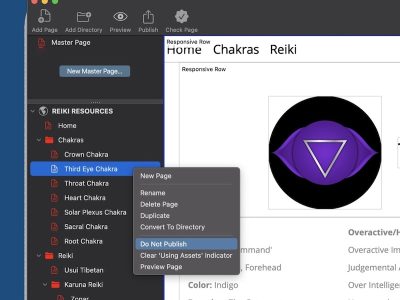
How to use a Favicon in EverWeb
You can easily add a Favicon to your website in EverWeb.
- First select the image that you want to use as your Favicon. This can be in any of the formats mentioned above. It’s best to make the Favicon something that’s easily recognisable – this is especially important in this scenario as the Favicon is very small!
- Once you have selected the image you want to use, go in to your EverWeb Project file. Select File-> Edit Publishing Settings to access your Site Publishing Settings.
- Scroll down to the Head/Footer Code section of the screen. At the bottom of the section is the word ‘Favicon’ with a ‘Choose…’ button next to it. Click on the ‘Choose…’ button and select the image file that you want to use.
- Publish your website to the Internet. EverWeb will convert the file you selected for the Favicon in to an ICO file and upload it to your web server. You’re now finished!
Testing Your Favicon
Once you have published your website to the Internet, you probably want to see the Favicon in action. If you visit your website straight away, you may find that the Favicon is not displayed. If this happens, check to see if the Favicon has uploaded correctly to the web server. For example, go to your home page in your browser. The web address may look something like the example below:
http://www.mywebsitedomain.com/homepage.html
To find if the Favicon has been uploaded properly replace ‘homepage.html’ with ‘favicon.ico’. in this example, the above web address would become
http://www.mywebsitedomain.com/favicon.ico
If the Favicon has uploaded correctly to the web server, you’ll see the small Favicon displayed on screen.
The Favicon may not immediately display due to replication of the file on the Internet, so you may find that visitors to your website see the icon before you do!


Comments