If you work on a laptop, screen real estate is often a precious commodity, especially if you’re using an 11 or 13″ MacBook. Website developers often feel the pinch when working on the go. You’ll probably want to have email available, a browser window open, and all your website development apps to hand. You can use your Mac OS to better manage your workflow better. If you’re using EverWeb there are also a few ways to get more screen real estate back. Let’s start with what can be done in your Mac OS…
Use Spaces
Using Spaces is a real boon. Spaces lets you have up to 16 different desktops available for use at any one time. In this way you can set up a specific ‘Space’ for a specific use e.g. if you take a lot of screenshots you may want to set up a Space that has a just plain white background so you don’t need to change your screen backdrop every time you want to take a screenshot.
Spaces also allows you to allocate which apps are available in which Space. You can choose either ‘All Desktops’, ‘This Desktop’ (which is the current desktop) or ‘None’ which makes the app available only to the desktop it gets opened on.
bear in mind that Spaces aren’t totally flexible though. If you have four desktops set up and want an app to appear on desktops 2 and 3 only, you can’t do it, which is a pity.
Setting Up a New Space
To setup a new Space, you need to use Mission Control. On a laptop use the F3 function key, or use a three finder upward swipe on the trackpad. You’ll see a menubar at the top. In the center of the menubar you’ll see the Spaces that have already been set up (e.g. Desktop 1). To add a new Space, click on the ‘+’ sign in the top right hand corner.
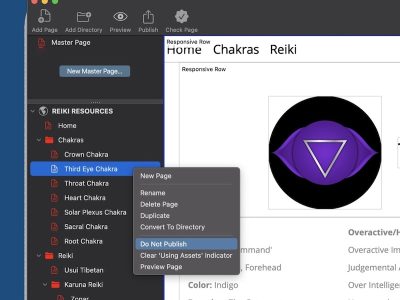
Now configure your new Space with the background that you want. To add the apps that you want to the Space you just added, right click on the App in the Dock. From the submenu, select ‘Options’ and then in the ‘Assign to…’ section choose the desktop that you want the app to be available on. That’s it!
Using Spaces
To switch between Spaces call up Mission Control using a three or four finger left/right swipe on your trackpad. Click on the Space of your choice.
Group apps together that fit nicely depending on your workflow e.g. I always make sure that I have EverWeb, Safari, Pixelmator, Pages and iTunes available when I’m working on website development. Everything else goes on different Spaces keeping me focused on one thing at one time!
Use Split Screen
Apple introduced split screen capability to the Mac in OS X El Capitan. This can be useful if you want, for example, to write a long piece of text in Pages, then copy it to EverWeb.
To split the screen, open both the apps that you want to share the screen. In the first app, click on hold on the green button in the top right hand corner of the window. The app shrinks to half the screen with your other apps showing on the right hand side. Click on the second app and it will fill the rest of the screen.
Use the vertical splitter line that separates the apps to increase or decrease the amount of screen space each app takes up (see screenshot below).
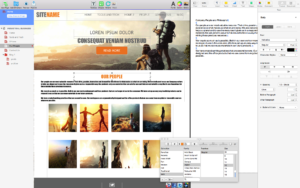
The split screen on a Mac lets you have two apps side by side. Use the splitter to give one app more or less screen space
You can switch which side the apps are on by just clicking and holding the top of the app window and dragging it left or right to switch side. If you want to unspoilt the window, just click on the green button in the top left of the app.
Be Smart Working With Your Apps
Getting to know the apps that you use can also help you save screen real estate. Apple’s Preview program is often the Swiss Army knife app that can save you having multiple apps open when you only really need one open. The same is true of word processing or presentation apps that often have cross product features that can save you loading two or three apps when only having one open gets the job done.
EverWeb and Screen Real Estate
EverWeb has some good ways to help get more screen canvas back. The Window Menu is where you need to be for this. Before EverWeb version 1.9 you could only use the Window-> Hide Inspector (Cmd+Option+I) menu to get more space back by hiding the Inspector Window. In EverWeb version 1.9 and later, you have this and the ability to hide the Toolbar (Cmd+Option+T). Use both the aforementioned commands if you just want the Web Page List visible. Finally, if you want to hide the whole EverWeb UI, use Presentation Mode (Cmd+.)
These easy to set up and use features of your Mac OS and EverWeb help you get the most out of limited screen workspace. They also help you to focus on the tasks to hand and be less distracted with other things if you organise your desktop Spaces wisely!
If you have a question about this blog article, let us know in the Comments section below!


Comments