Blogging with EverWeb version 2.0 gives you a dynamic canvas to work with. Here are some hints and tips that we’ve found to share with you…
- Use the Page Settings Tab
- Master Page or No Master Page?
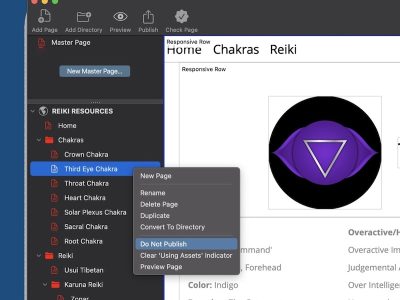
- How to Add a Thumbnail
- Select the post you want to attach the thumbnail to in the blog posts list of the ‘posts’ page.
- Next go to ‘Post Image’ in the Post Options section of the Widget Settings.
- Select the image you want using the ‘Choose…’ button. When you select a Post Image it can then be used as a thumbnail for the post in the blog main/archive pages.
- The image appears in the Preview window of the post. If you do not want to display the image in the post itself, select ‘No Image’ as the ‘Style’.
- Next, go to either the blog or archive page.
- If you do not see the thumbnail displayed next to the post, select the widget. Next, go to the Widget Settings and set the ‘Style’ to something other than ‘Just Text’. The thumbnail will appear.
- Using Extra Space
- Setting a left hand margin when using Full Width
- Resolving gaps between shapes in your blog
- How to duplicate a blog post
As you probably know by now, when you create a blog in EverWeb, it contains three pages: blog, posts and archive. Just like any other web page that you create in EverWeb you can apply page settings such as content width, content height, header and footer height and so on. Remember that you can also set the page and browser background as well.
The Page Settings tab is especially important for the posts page, as all of your posts will adopt these settings as you can see by looking at the blog posts preview window.
You can set defaults for the posts page using Page Settings and you can also add objects to the blog posts preview window that are then applied to all of your blog posts as well. So, what about Master Pages? Where do they fit it?
The answer to this question is that it depends on how you want to work. If you use a Master Page, you will have to edit the Master Page to make changes. If you use the blog posts preview window instead, objects can be edited ‘live’ so any changes you make are instantly reflected on all blog posts. You may prefer one way of working over the other. You may find that using a combination of the two is best e.g. you use a Master Page to apply certain website defaults, such as content width and height, background colors etc. to your blog posts. You then add specific objects to the blog post preview window to customize the blog to make it appear as a special part of your website.
You can add a thumbnail image to your blog post when it is displays on the blog main or archive pages. To do this:
If you want to add extra space between your blog post listings in the blog main and/or archive pages, you can use ‘Extra Space’. If this does not seem to work, check to see if you have a thumbnail image included. If the thumbnail is higher than 50px the ‘extra space’ will not appear as it’s been used by the thumbnail.
If you’ve set the blog posts preview window widget to ‘Full Width’, you’ll see that your text appears flush against the left hand margin of the browser window. To create a margin on the left hand side, make sure the ‘posts’ page is selected then go to the Text Inspector tab and use ‘Insert Margin’ to create the left hand margin you require.
Shapes are often used to define specific specific areas of a web page e.g. a horizontal, colored rectangle is often used in the footer. A vertical rectangle shape is sometimes used down the side of the page e.g. to define a sidebar or navigation menu. You may want the vertical and horizontal shapes to meet to give the page a continuous appearance. That’s usually easy to do, but in blog pages you may see a gap where the vertical shape should meet the horizontal shape. This happens because the blog widget automatically adjusts vertically on publishing so pushing the footer down. To stop the ‘gap’ appearing set ‘Allow Free Dragging’ ON for the vertical shape and extend the shape down enough so that some of it encroaches into the Footer shape. This will ‘cover’ the gap (see screenshots below).
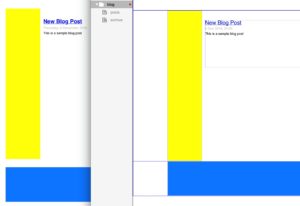
On the right is the blog main page with where the yellow column meets the blue column. To the left if the preview, showing the gap between the object in the body area and the object in the footer.
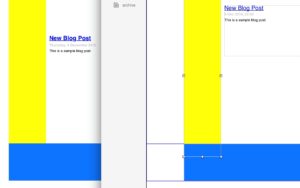
On the right hand side, the yellow column has ‘allow free dragging’ set on an the object encroaches into the footer underneath the blue object. The result to the left is no gap between the objects when previewed.
Remember to first test using Preview to make sure the gap is filled before publishing!
If ever you need to duplicate a blog post, select the post you want to duplicate in the blog post list. Right click on the post name and select ‘Duplicate’ from the menu. EverWeb will make a copy of the post for you!
And finally…
EverWeb version 2.0.2 is now available!
EverWeb had a maintenance update last week with the release of version 2.0.2. It’s a bug fix release and also includes some minor enhancements to the product. Check on the EverWeb-> Check for Updates… menu to update your version. For more information check out the blog on the EverWeb website!
Got your own tips about blogging in EverWeb to share? Don’t keep it to yourself, let us know in the Comments section below!


thanks for sharing the tips .it so helpful
This programme is driving me crazy. I do not see any Post Options section of the Widget Settings so have not succeeded in attaching a thumbnail image to posts .
I have also been UNABLE TO:
-put more than one picture in a blog post? I don’t want a gallery. Just occasionally more than one photo.
-put a text box in an individual blog post?
-Indent a paragraph in a blog post
-Create a style for headings etc in a blog post. There is not much choice in the defaults offered.
Please help. I am spending hours just watching your videos and searching to solutions. It is going to take me months to complete this simple website.
Jacqui
HI Jacqui
Thanks for the questions! I hope that the following will help you…
1. To get the widget settings, click on the ‘posts’ page in the Web Page List on the left hand side of EverWeb. Next, click on the Gear icon just below the Widgets tab and you should see the Widget Settings for the posts. If the Widget Settings do not appear, make sure that the widget in the blog posts preview window is selected. This is the section in the bottom third of the posts screen. If the widget (the box that contains the post title, date and text) id not selected then the Widget Settings may appear blank.
2. Yes you can add more than one picture to your post. You should be able to drag and drop pictures on to the editor. When you import use more than one image, when they are dropped on to the editor window, they are displayed one beneath another. To change this, select the image you want and use the image Toolbar menu to change the display to ‘break text’ instead of ‘inline’. That may make it easier to manipulate images when they are imported.
3. Text boxes in the blog post itself… at present you can’t do this. There are some limitations as to what can be aded to the editor window at the moment and this is one of them. The only wy round this at the moment is to create an image file with the text that you want and drop that in. Let’s hope this feature comes in the near future!
4. You can indent text in the editor using shortcut keys Cmd+] and Cmd+[ for indent and outdent respectively.
5. You will need use the widget settings for this. When they appear you can set the style that you want for the heading. Make sure that you have the Inspector tab highlighted, then select the widget settings using the gear icon. Then you can select Header options using the Fonts button.
6. For setting line spacing, highlight the text you want to change the line spacing for in the blog post editor window.. Then go to the Text Inspector and adjust line height. You can go from 0.1 – 2.0 using this option.
Good luck and let me know if you still have problems or questions.
Best
Simon
I forgot. I also can’t change the line spacing.
Please see my previous answers, thanks!
Editing in the blogger is confusing. It’s hard to tell which box (upper editor or lower preview) to use.
The photos show in the upper editor and lower preview (and spending a lot of time moving it around in the editor to see if it shows in the preview properly). It’s NOT WYSIWYG, it’s What You Guess is What You Get.
But, my primary gripe is the blog image does not appear on the main blogger “directory” page/folder summary. Is there a way to have it show?
It took me a long time to realize putting an image in the blogger is nothing like placing one on a regular page. Other than sizing, you have no control; no tilt, no border, no shadow. But, I wouldn’t care about any of that if it just showed in the main blogger directory. Otherwise, an all text directory can be difficult to find what you want without reading all of the text summaries. No one reading the website will enjoy being hit by a page of just text.
Adjusting the blog width is easy, but it’s a pure guess, too.
editor – preview and what gets posted are all slightly different, so it’s a lot of edit – preview – edit – preview – post – edit – preview – edit – preview – post – edit – preview – edit – preview – post until you get it right. It’s not WYSWYG.
Yes, I watched both blogging help videos many times thinking I’m missing something.
I’m glad Everweb has the ability to add a blog page, but editing it is nothing like the rest of the app if you want a professional looking blog.
Thanks for the comments about the blogging feature of EverWeb. Many blogging tools (not all!) use a basic editor tool and a preview option to show the final result so it’s not an uncommon approach. The advantage here is that EverWeb shows you a live preview. it does take some getting used to! The blogging environment has seen some updates from the original 2.0 version, but the features that you want are great and I would encourage you to post a feature request on the EverWeb Discussion Forum with what you would like to see in future releases.
You should be able to see your image on the main blog page. You have to first of all make the image a Post Image in the Post Options section of the Widget Settings of the post itself. Once you have selected the image that you want, go to the blog main page. Select the widget (which holds the index) and on the Widget Settings, set the Style to be something other than ‘Just Text’ In this way the image from the post should be displayed on your index page.
Hope that helps!
hanks for the comments about the blogging feature of EverWeb. Many blogging tools (not all!) use a basic editor tool and a preview option to show the final result so it’s not an uncommon approach. The advantage here is that EverWeb shows you a live preview. it does take some getting used to! The blogging environment has seen some updates from the original 2.0 version, but the features that you want are great
You should be able to see your image on the main blog page. You have to first of all make the image a Post Image in the Post Options section of the Widget Settings of the post itself. Once you have selected the image that you want, go to the blog main page. Select the widget (which holds the index) and on the Widget Settings, set the Style to be something other than ‘Just Text’ In this way the image from the post should be displayed on your index page.
Editing in the blogger is confusing. It’s hard to tell which box (upper editor or lower preview) to use.
The photos show in the upper editor and lower preview (and spending a lot of time moving it around in the editor to see if it shows in the preview properly). It’s NOT WYSIWYG, it’s What You Guess is What You Get.
But, my primary gripe is the blog image does not appear on the main blogger “directory” page/folder summary. Is there a way to have it show?
It took me a long time to realize putting an image in the blogger is nothing like placing one on a regular page. Other than sizing, you have no control; no tilt, no border, no shadow. But, I wouldn’t care about any of that if it just showed in the main blogger directory. Otherwise, an all text directory can be difficult to find what you want without reading all of the text summaries. No one reading the website will enjoy being hit by a page of just text.
It took me a long time to realize putting an image in the blogger is nothing like placing one on a regular page. Other than sizing, you have no control; no tilt, no border, no shadow. But, I wouldn’t care about any of that if it just showed in the main blogger directory. Otherwise, an all text directory can be difficult to find what you want without reading all of the text summaries. No one reading the website will enjoy being hit by a page of just text.
How do you add blog posts to the Archive list, or how do they get archived is probably my question.
Thanks for the question… blog posts are actually automatically added to the archive list. In fact the blog index and archive are the same list, but for the index you probably only want to see the first few blog posts. Use the Display Posts option in the Widget Settings to set the number of posts you want to see. The slider stops at 10, so if you only want to see the latest five posts, type 5 into the field.) For the archive you would probably want to list all of the posts listed. That’s all there is to the archiving feature… If you’ve got suggestions on how you would like to see this improved, I would suggest going to the EverWeb Discussion Forum and add a Feature Request so the developers know what you would like to see in the future!
Hope that helps!