
 By
By The recently introduced EverWeb 4.5 for MacOS and Windows adds a whole range of new and updated features to the product. It also changes some of the ways in which you interact with EverWeb. Inevitably, you’ll be changing the way in which you use EverWeb which may take a little time to get used to. The changes are there to make EverWeb more flexible to work with and also to enhance your EverWeb website development and design experience! Let’s look at the things that have changed, why they’ve changed and how to quickly get acclimatised to working with the new UI!
Why The Change in EverWeb’s Workflow
Since EverWeb officially launched version 1.0 back in 2015, there’s been a lot of change and development with both the product and the Internet, even with the way in which we communicate as well as the impact of AI. Technology evolves and EverWeb with it. So, things evolve. Perhaps the most important aspect in respect to EverWeb 4.5 is that Containers, introduced in EverWeb 4.4, now match and surpass the functionality of the Responsive Row widget. There’s also the introduction Pin Settings that allows you to pin objects on the page wherever you want, even in responsive pages. These two features now realign the way in which you can design your site, especially for responsive websites. In a way, this is like giving responsive pages the abilities found in fixed width sites, whilst retaining the responsive structure. So let’s dive in with the changes!
Saved State
One of the changes to EverWeb that you will probably appreciate it but may not even notice is that when you exit your project file, EverWeb will save it’s state so that next time you enter the project, you’ll be able to pick up where you left off. EverWeb will open at the page in the project that you were last on. It will also preserve the Web Page List from last time, so you will no longer have to re-open folders again. Also all of the splitters that you may have set will also be remembered. The saved state will apply to the project only. Before EverWeb 4.5, some options such as horizontal and vertical splitters, were applied to all project files instead of on a project by project basis. And you can even reorder the Paragraph Styles list as well!
Saved state is something that will save you time, effort and frustration when setting up how you want EverWeb to look! It’s a welcome change.
Object Placement on Responsive Pages
We begin with a change to the way in which you add objects to responsive pages. For example, if you created a responsive page before EverWeb 4.5 then immediately added an object such as a shape, TextBox, or image to the page, it would be added as a full width object. A lot of the time, you would probably want these objects to be fixed width in the first place, rather than full width across the page. In this case, you would then have to make the object fixed width object, and add it to a Container or Responsive Row widget.
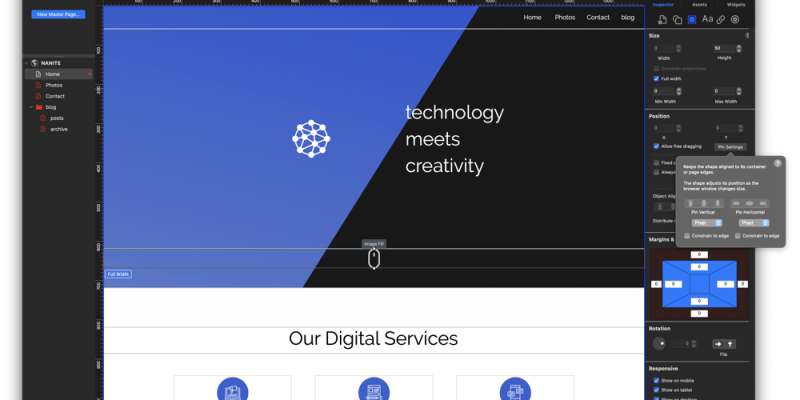
In EverWeb 4.5 this has changed. When you add an object such as those types we just mentioned, it will be added ‘as is’, i.e. as a fixed width object in the same way as you would expect when using a fixed width, center aligned page. That’s the first change but take a look at the Metrics Inspector next. You’ll notice that ‘Allow Free Dragging’ is On, which also activates the new Pin Settings button. If you added the same object to a fixed width page, ‘Allow Free Dragging’ is Off as it’s usually not required here. As a consequence, Pin Settings will be deactivated.
In our example, the rectangle shape in the Responsive Page has pin guides around it. These guides show you how the object responds within the edge of page, or Container. Click on the Pin Settings button to see how the pin guides match up with the Pin Settings. In our rectangle example, the object is horizontally centered within the constraints of the page edge.
You can see how this new way of working works. Simply create a responsive page using one of EverWeb’s Responsive Theme Templates. Once you have added the page, add a rectangle shape on to the page, then preview it. As you change the width of the browser you will see how the pinned object reacts. After previewing, you might want to change the rectangle’s Pin Settings to see how it works under different settings as this will give you a good feel for how to use Pin Settings.
Containers You Always Wanted!
One of the highlights of recent EverWeb releases has been the introduction of Containers in EverWeb 4.4. Containers give you more flexibility than the Responsive Row widget can. You can use Containers to layer objects as well as setting their layout to either row, column or free flow. These features give your site’s design greater flexibility than ever. In EverWeb 4.5 there are two additional features that were previously only in the Responsive Row widget: Object Wrapping with Wrap, Reverse Wrap and None options. The second feature added is Content Maximum width and there’s also a new Height option as well. Use this option to set the Container height to adjust automatically, or set it as fixed. Additionally, you can set the minimum and maximum height of the Container is needed.
One extra addition to Containers is the ability to Allow Free Dragging on objects within the Container. This means that you can now pin objects within Containers which is incredibly powerful. For example, you may have a Column Container, but want a ‘% Off’ button in the top right hand corner. Add the oval object to the container. It will appear in the column as you would expect. Next tick Allow Free Dragging. This will allow the oval object to be moved up in to the right hand corner. Use the Pin Settings button to determine which edges of the Container you want it to attach to.
These updated features give you all that you need to replace the use of the Responsive Row widget with the more versatile and flexible Container.
Next Time…
We’ve discussed only some of the changes that have been introduced in EverWeb 4.5 to streamline its workflow for the future. There’s more though, so checkout part II of this post, coming soon!




 Loading ...

Comments