In May this year I published what has turned out to be a rather popular iWeb tutorial on how to add Lightbox to your iWeb site. I have been contacted many times since (and there have been quite a few comments made too) about adding Lightbox 2. Last night I spent 5 hours trying to get Lightbox 2 working with an iWeb site and have come to the conclusion that it doesn’t.
There are loads of Lightbox clones available to download on the Internet, but I needed to find one that did what Lightbox 2 does and was easy to install. After a while I found a little code called Lytebox which turned out to be perfect for the job.
So after much head-scratching and deliberation I have finally managed to get this iWeb tutorial together for you so that you can have a go at adding Lytebox to you iWeb site.
Before I start, what’s the difference between the original Lightbox and it’s later version? You can now have image sets; rather than individual images which basically means that you can assign relevant images to groups. This means that if you have classed a group of images together as a ‘set’ when a user visits your Lytebox gallery and views your images, when they hover over an image a little arrow will appear which they can click on to go to the next image, rather than close the Lytebox window down. In addition there are some new transitions. It is the fact that you can create image sets that I am going to concentrate on in this tutorial; you can get the single image effect with the first version of Lightbox.
As with my previous tutorial I will start by giving the warning that this tutorial involves editing the HTML code in your iWeb page directly. If you don’t want to do it then look away now!
Much of this tutorial is similar to my initial Lightbox into iWeb post so bare with me.
Start by collecting together all of the images that you want to have in your Lytebox gallery in one place; I chose the desktop of my iMac. They should all have something in common as you are going to create an image set from the whole collection.
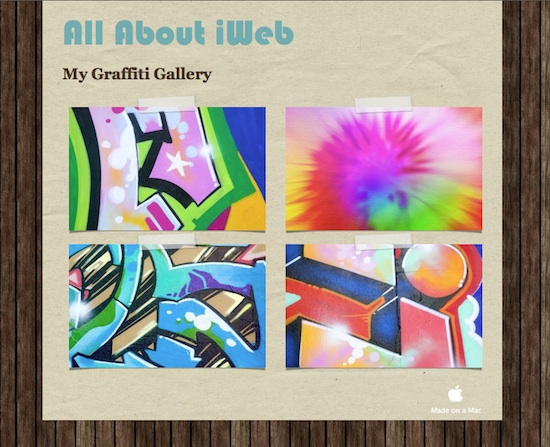
Open iWeb and create a new page for your image gallery – remember DO NOT call the page Lytebox. Now one by one add the images to your iWeb page and style/arrange them so that you have your iWeb page looking exactly how you want it.
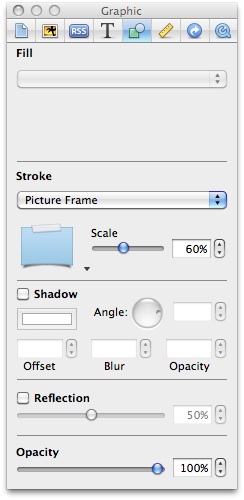
There are lots of border options to choose from under the ‘Graphic’ tab in Inspector.
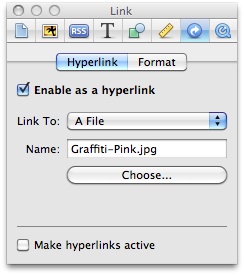
Now that you have Inspector open select the ‘hyperlink’ tab (that’s the one with the blue circle/white arrow icon on it). Select the first image and create a hyperlink to the image that is on the desktop by adding a tick in the ‘Enable as a hyperlink’ checkbox , selecting ‘A File’ in the ‘Link To:’ drop-down menu then navigating to the image using the normal ‘Finder’ way.
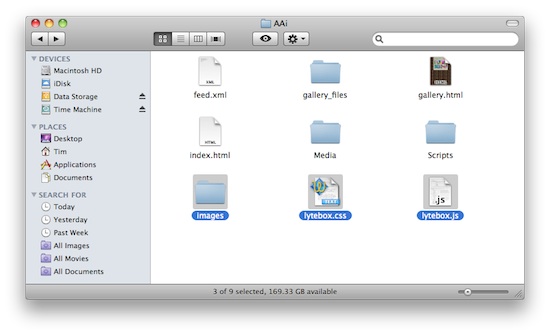
Once you have done that you need to publish your iWeb site ‘to a folder’. This saves your site to a location you specify on your Mac’s hard-drive; this is done so that you will be able to edit your HTML.
In ‘Finder’ navigate to where you saved your iWeb site and open it’s folder. It is at this point we add the Lytebox files. Point your browser to dolem.com and download the Lytebox zip file. Once that’s done extract the folder ‘Lytebox_v3’ and then open it. There are 2 files and one folder inside so drag/drop them into your site’s folder. Remember, your site’s folder not your page’s folder.
Once you have dragged/dropped it is time to get down n dirty with some HTML so open your gallery page in your favorite HTML editor. As I have mentioned a few times on this blog I like to use TextWrangler from BareBones Software.
A quick lesson in web pages: A web page is made up in 2 parts, the ‘head’ section and the ‘body’ section. The head section contains parts of code that your web page needs to work, such as links to CSS files, meta-tags, links to Javascripts and the like. The body section contains the code that (in a nutshell) is your page; all of the content (text, images etc) and in which divs it should appear.
We are going to be adding some links back to javascript in the head section of our gallery pages and a bit of code to the content (in this case images) in the body section.
Once you have your web page open (mine was obviously the one called ‘gallery.html’) in an HTML editor scroll down a bit (or do a search) for </head> within your code.
When you have found it, paste the following code into a new line above it.
<script type="text/javascript" language="javascript" src="lytebox.js"></script>
<link rel="stylesheet" href="lytebox.css" type="text/css" media="screen" />
You have now inserted the code that tells your iWeb gallery where the javascript is that will make it work and where the CSS is that will make it look good.

And that is the end of Part 1 – I told you this was easy.
The next thing we have to do is add a bit of code to each of the images to activate them; make them work in Lytebox.
Scroll down your page and you should start to see the sections of code that relate to your images.
In the previous tutorial we added the bit of code ‘rel=”lightbox” ‘ to each link and we will be doing the same again in this one. However there is a twist. Because we want to use an image set we have to add a little bit more. So after the part of the code that lays out the source of the image insert the following code.
rel="lytebox[imagesetname]"Obviously the name of the image set (imagesetname) depends entirely on you so you can change it to what you want. In my example you can see that I called my image set ‘graffiti’.
Carry out this step for all of your images.

Once again, as with the previous lightbox tutorial you can also add a ‘title’ tag to the code which will show up as a caption in the lytebox gallery. Just add the following code after the previous snippet:
title="my caption goes here"You may notice that iWeb has already added the title tag for you, if that is the case just amend the text it has given between the quotation marks (by default it is normally the path to the image).
Now save your page. That’s it, you have finished…..almost.
You can test it out by opening the page in your browser of choice. You probably won’t see the loading image as all of the images are saved on your Mac rather than the internet but there would be one there by default. You can see in the image below the ‘next’ button that appears when a user hovers their mouse over your gallery.
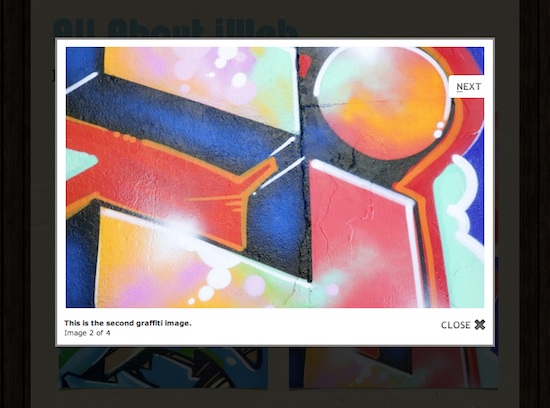
You can now publish your site as normal, either using an FTP client if you have a private host or by simply copy/pasting the files into the relevant folder within ‘Sites’ on your iDisk if you have MobileMe.
If you have inserted a Lytebox gallery into your iWeb site why not leave a link in a comment and let us take a look.






Hi,
I was able to set everything up as you suggest–and I can drag that html to Safari and it all works–but question is how do I get that back into iweb so that I can publish? How do I get this newly coded html to talk to the iweb file I started with? I just said that. Ok, so any help would be greatly appreciated.
Deb
This helped me a lot. Many thanks!
Dan
Thanks!! I tried so many different lightbox app’s and finally settled on this for two reasons…
1. it doesn’t have a brand name in the corner i.e. VisualLightBox/ Airtight Viewer … and 2. it is SO simple to use with iFrames which seem to be essential in iWeb to get some nice effects.
Feel free to check out how I’ve used it on http://www.zizimages.com, and all feedback is welcome!!
@TIANNA: If you really feel that you have done everything correctly i.e. the code and all references are right, then it could just be that the lytebox files (.js and .css) are saved too deeply. Save them in the root folder, or one subdirectory in, Anything deeper than this just would not work for me.
Zaid, how you did the play/pause function to your galleries files??
i found this extremely helpful, however my one problem is that the images seem to be taking a very long time to load in lytebox….. is there a max file size the images should not go over to speed up how fast they load on my page?
http://alysonleighrosenfeld.com/photos/photos.html
thanks for any help/advice!
Hello Aly,
I just checked out your internet page and your gallery looks amazing!! So I was wondering if you could tell me how you did it… did you use this tutorial and “lytebox” or what did you use??
Thanks in advance for your comments
So I edited the .html pages yesterday and uploaded them to my MobileMe server. When I access the site through my MobileMe page (http://web.me.com/noahchristman) it works excellently.
However, when I access the site via a personal domain that forwards to the page and masks the URL (www.design-planner.com) Lytebox doesn’t work, and all linked pictures just open in a new tab.
This is very frustrating…anybody have any idea why it is doing so and what I can do to resolve it? Thanks!
Hi Tim,
I was hoping that you could help me out? I followed your tutorial to the T, but I’m having some trouble. I’m new to trying out the things you wrote about so that is probably why.
The Lytebox effect looked great when I opened my HTML file through Safari:
file:///Users/abby/Desktop/iweb%20test/photo_testing/photos.html
… But when I went to publish through iWeb, the Lytebox effect was gone. When I clicked on the images, it would take me to a new window with white around the image:
http://web.me.com/abby.anderson/photo_testing/photos.html
Can you help?
Thanks,
Abby
I tried it twice and it does open in a new window, but not he Lytebox window. Also tried going to previous tutorial and following those steps.
I’ve had an HTML class, but am new at this. Help!
THANK YOU, Tim! That was so helpful! I had absolutely no problem to figure it out based on your detailed tutorial. I have no experience with building web pages and this is the first time I’m trying to build a website in iWeb. iWeb itself is a very intuitive software but what I couldn’t figure out was how to make a nice working gallery of images. I never thought it could be that easy! Thank you, thank you, thank you!!!
Works nice except pics don’t have the “next” option when hovering the mouse over it… Any ideas why?
Thanks in advance!
Actually got the above mentioned problem resolved but now have another one… All works well except where it matters most- online. When I test it from the folder saved on my Mac it works flawlessly but when on the actual internet when clicking on a pic it opens it in another window……… Not sure what to do, any ideas on how to fix the problem?
Thanks again!
Israel,
How are you uploading your site to the internet?
Tim – AAi
My images are opening in a new window as well… what could be the reason for this? I haven’t published to mobile me yet.
Rachel,
Can you publish and then let me know the URL so I can take a look at your page code. I should be able to see where the problem is then.
Tim
the URL is http://www.lulubellesfabrics.com under the Gallery tab is where the pictures are
Let me know what you find.. Thanks!
Rachel
Rachel,
how did you publish this page to your host? There is no code that relates to the tutorial within your page. Did you make the changes and then go back to iWeb to publish?
Tim
It is published on a Mobile Me account… I made the changes in an HTML editor and then published through iWeb to the Mobile Me account.
That’s where you are going wrong Rachel. Don’t go back into iWeb once you have made the changes as it just overwrites the code again. As you are on MobileMe you can ue Finder to copy the site folder over to your iDisk. You can even forget the saving to a folder in iWeb and edit the folder directly on your iDisk so the changes are instant.
I hope that helps,
Tim
This was great! I have never used html code before… and you made it very easy! Great Work! I love this site!
Tim, your site is amazing. Thank you so much for helping to make iWeb a more unique web builder! I’m having trouble getting the lytebox to work on my site, though. When inside my local published folder it looks great, but when i upload it to my MobileMe page it comes out all crazy. My text that was white is now black, which blends into my background. And my pictures load at the bottom of the screen or on another page. I know you’re probably terribly busy (god knows going through all my code to try to figure out what I’m missing has had me working for nearly two weeks now on it, so I can’t imagine how much time you spend finding new things to do in iWeb!) but if you could point me in a direction to fix this monstor I’d be so thankful.
Uploading the site though my iDisk was slow, so I’ve been uploading through the MobileMe website. The folders and files are exactly as they are on my local folder. And im testing viewing in both safari and chrome. I might be going insane!!
Elhofferdesign.com
Thanks so much for the tutorial Tim!
Catherine
🙂 It looks like I may have solved the issue by wiping the site in the mobileme browser, then syncing to my idisk.
thanks for all the tutorials! your site is brillant and has helped my iweb site to be much more interesting! thanks so much!!!
Hi! this is directed to something Israel said about the next button-
*Works nice except pics don’t have the “next” option when hovering the mouse over it… Any ideas why?*
but then she retracted and said she had fixed it. Can I ask how? Does anyone know? Im having a helluva time trying to figure it out. (I’m opening it in Firefox)
Thanks!
Hi Tim!
Thank you so much, this is exactly what I was looking for!
There’s only one thing, that somebody said in an earlier comment too: Sometimes the pictures take a while to load… Do you know what could be the reason for that?
Thanks!
http://www.christophhuber.com/christophhuber/photos.html
Hi
Im having the same issue of the images opening a new page, could someone help me out please.
the page in question is http://tinyurl.com/6ba5nrk
(ps I had the same issue when I tried the Lightbox version too)
Thanks
Jen,
You haven’t given your image set a name, you have just added the image name after the ‘rel’ tag rather than giving the whole set of images just one name (such as ‘invitations’). Also, have you copied the css file to your site? I can’t find it anywhere!
Tim
Thanks Tim,
I had totally forgot to upload the lytebox files, opps
Thanks for you help.
Hi Tim
I’m having the same problem many people have reported already – the images just open as a file in another window. I’m assuming that this is because I went back to iweb to publish, but I have no idea how to publish it without iweb, I don’t use MobileMe and frankly have no idea what exactly iDisk is – so could you tell me how exactly I upload my site without iweb?
Many thanks,
Josie
Hi!
its working great for me, but for some reason iweb is reducing my images size (the light box images). do you have any idea why is it happening?
thanks
ofri
Tim, like some of the others, the photos take an extraordinary amount of time to load. THe pictures themselves are all under 200k in size. Is that small enough or should they be smaller?
Hi Drew,
As a rule of thumb 100k is a good idea. Remember mobile users!!
Tim
Hi Tim,
Thank you so much for posting this tutorial. I’m having the same problem as an earlier post by Noah… Everything works great when I upload the site and look at it using my MobileMe address:
http://web.me.com/jcaliva/paytontaylor/Home_3.html
(click on the thumbnails under “Photos”)
But when I try to view the page through my personal domain, which masks the MobileMe address, it doesn’t load correctly:
http://www.paytontaylor.com/Home_3.html
If you can offer any help with or solutions for this problem, it would be greatly appreciated.
Thanks so much,
Joe
Hi… I can see the slide show window when i click on my page’s images but can not see next and prev buttons…can you help…
here is the link…..
http://www.gulfidanozmen.com/silhouettes.html
thanks…
Can you open .mov files in the lightbox?
Hi,
Thank you for your tutorial. I had to lookup the Lytebox website to get the image groups to work. But somehow I got it working on all but one of my galleries. When I use the same method used on the other galleries lytebox stops working all together on the “travel” gallery.
Could you please take a look at my sourcecode and maybe give me some pointers!?
http://www.federicojimeno.com/Federico_Jimeno_Photography/Travel.html
Thanks in advance!
Hello FEJICO,
I looked at your internet page and it looks amazing. I was wondering what you used to set your gallery.. did you used this tutorial or what software did you use??
I am having some problems because the “next” button doesn’t show up when I hoover over the picture… anybody here who can help me with this??
Thanks
Does this code reads perfectly on iPad?
Hello Tim,
Thanks so much for this tutorial… it’s not the first time I have used AAI to pimp my webpage. It is really easy to follow the steps and everything is explained so clearly 😀
I was having a problem though, I just couldn’t get the “Next” button to show up when hoovering over the picture.
BUT now it’s working perfect!! The problem was that I had downloaded the latest version of lytebox (v5.5), instead of v3 (as instructed on your step-by-step article) 😉
I think some other people might be having the same problem, so I hope this hint helps out.
http://www.witt.com.mx/Bicis.html
Cheers
Lytebox doesn’t work when masking/redirecting the URL. I’m having the same issue. Did anyone ever get a solution?
Thank you