There cannot be many Mac users who have not seen or do not know the ‘Coverflow’ effect that Apple created as a means of displaying (initially) album covers in iTunes, on iPhones or the iPod touch and which has now been brought into Finder and some of the more recent iPods. It’s a pretty cool gallery effect and method of diplaying images and recently I received an e-mail from Henrik (he also left a comment too) asking about how to achieve this effect in iWeb.
I was intregued. It must be possible, however I had only ever seen it recreated in Flash. I wanted an easy way to do it, and one that would fit in with iWeb.
After much searching I found an excellent web-site run by a chap called Finn Rudolph. He’s worked out how to get the Coverflow effect in javascript and called it ‘ImageFlow’. You can take a look at his web-site at finnrudolph.de. It’s a mine of useful information and contains loads of examples of ImageFlow at work as well as tutorials on how to customize it further to fit in with your iWeb site.
Adding the ImageFlow gallery into your iWeb site is fairly easy to do if you don’t mind getting down and dirty with a bit of HTML. If you followed my recent add Lytebox to iWeb tutorial then you will know how to add code to your HTML pages; with this tutorial there is a little bit more but I will try to make it as painless as possible.
I must also add that if you want to get a good looking ImageFlow gallery in your iWeb site you will need to do a bit of preparation before hand. More so than most of the tutorials I have published on this site. Not only do you have to get all of your images ready, but you have to make a few changes to the gallery code too before you get everything looking gorgeous; so lets get on with it.
As I said above, to begin with you will need to prepare your images. ImageFlow galleries tend to look best if all of your images are the same size (or at least all landscape or all portrait) but it is not vital; you can put more than one ImageFlow gallery in a page.
Once you have all of your images looking gorgeous and ready you need to prepare a second set. This second set of images will act as the thumbnails (ie album covers) within the ImageFlow gallery. Your main images will be the ones that will be shown when a user clicks on a thumbnail. The quickest way I found to resize the images is using ‘Preview’.
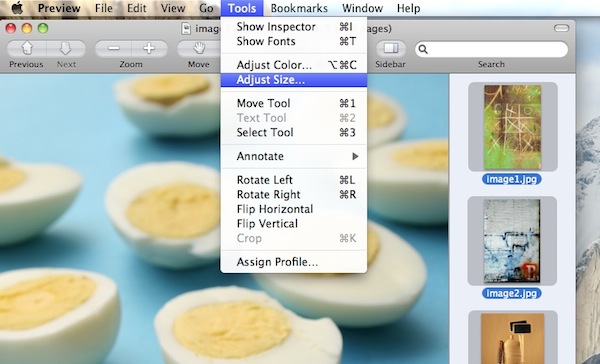
Personally I copied all my images to my desktop, selected all of them and opened them all at the same time in Preview. I then selected all of them again and went to Tools>Resize Image and entered in the new dimensions (although this will only work if you start with images that are all the same size to begin with. If your images are different sizes then adjust the size by using percentages; I used 40%). I then saved all the images once again with the prefix ‘thumb_’, just for ease.
You will need to take note of all of the image sizes of the thumbnails before you continue. You can get this information by right-clicking on each image and selecting ‘Get Info’ from the drop-down menu.
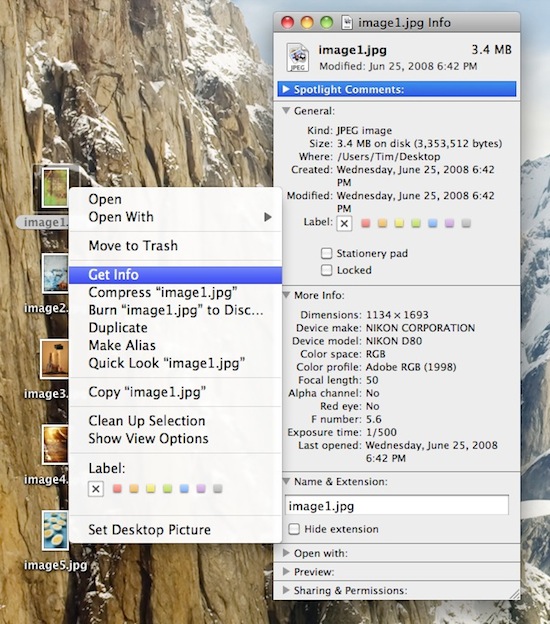
So by now you should have two sets of images, one large set that you will have on your iWeb pages and one smaller set to act as thumbnails for the ImageFlow gallery.
Next we have to download the files from Finn’s site so that we can add them to our iWeb site. Head over to Finn Rudolph’s download page to get the necessary files. When you have downloaded the file rename it to ‘imageflow’ and copy/paste all of your thumbnail images into it.
At last it’s time to open iWeb. First you have to create a page on which you will place your ImageFlow gallery. Give it a name (I called mine ‘gallery’) and save it. Next within your chosen theme you will need to create a page each for the larger images. If you have loads of pictures to add this may take a while so it may be best to practise with just a handful. It may be prudent to assign page names the same as the image name and don’t forget to take the 2 ticks out of the boxes in iWeb’s Inspector regarding page navigation. You do NOT want these pages appearing in your nav-bar. You also want to add a button on each image page that takes a user back to the ImageFlow page; you can use the ‘hyperlink’ tab in Inspector. You will only have to do it on the first page then you can copy/paste it onto all of the other pages.

When I created my working ImageFlow iWeb site I named all of my images as ‘image1’, ‘image2’, ‘image3’ etc. I therefore named all of my iWeb pages the same way, so dragged n dropped ‘image1.jpg’ on to a blank iWeb page and called that page ‘image1’ as well. You don’t have to do this at all but for ease of use (especially if you have a lot of images) it really is the best way.
Now go back to the blank page you created and add a text-box. Within that text-box type the word ImageFlow and postition it on the page where you want the gallery to appear.

You now have to publish your iWeb site to a folder (or if you use MobileMe publish to your web-space you can still edit the files from your iDisk).

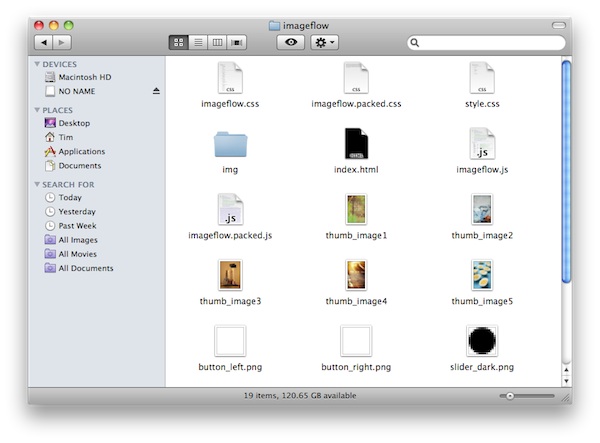
You can see in the image above my iWeb site (called ‘portfolio’) with all of the pages and the folders that iWeb has created for each page. Top right is the ‘gallery’ page which contains the ImageFlow code. To the left of that is the ‘gallery_files’ folder which contains all of the pages elements such as CSS files and javascript.
Into the gallery_files folder (or what ever name you have selected) we now have to paste all of the contents of the ‘imageflow’ folder that we created earlier (the one with all your thumbnails in).
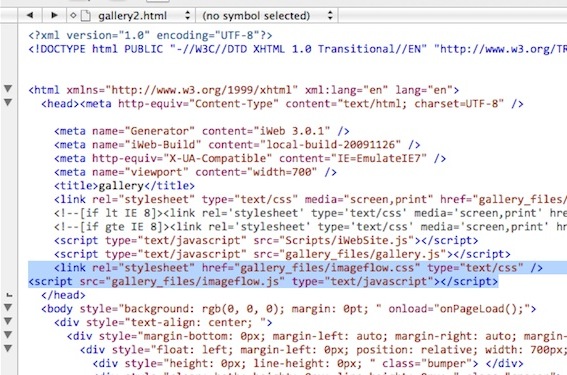
And now we move onto the code editing. We are going to edit three files in all; the gallery.html page itself, and two files that we downloaded. Start by opening your gallery.html in an HTML editor and scroll down slightly until you see the end of the ‘head’ section marked with </head>.
Just above that you need to paste in the following code:
<link rel="stylesheet" href="gallery_files/imageflow.css" type="text/css" />
<script src="gallery_files/imageflow.js" type="text/javascript"></script>
You will see once again I have added ‘gallery_files’ in red; you need to change this to fit in with whatever you called your page.
Next scroll down the page a little further until you see the word ImageFlow (that you typed in earlier). We are going to overwrite the text-box effectively with some code.
Find the line that starts:
<div id="id3"
and select all of the code up to including the line that starts:
</div>
There should be 5 lines in total. Delete that bit of code and paste in the following:
<div id="unique_name" class="imageflow">
<img longdesc="image1.html" src="URL1" alt="Comment" width="w" height="h" />
<img longdesc="image2.html" src="URL2" alt="Comment" width="w" height="h" />
<img longdesc="image3.html" src="URL3" alt="Comment" width="w" height="h" />
</div>
The parts that I have highlighted in red are all dependent on what you have called pages and images within your site and what size your thumbnail images are.
For my iWeb site (as I mentioned above) the pages that contain the larger images are named the same as the image themselves, therefore you can see that in the ‘longdesc’ section of the code above I have entered ‘image1.html’. The ‘longdesc’ element sets the page (or URL) of where the large version of the image is kept.
The ‘src’ element is where your thumbnail images are stored. You will see a bit later on that we will be copying the thumbnails into the same folder that iWeb creates for the ImageFlow page so for my site I would have the following for the ‘src’ element:
src="gallery_files/thumb_image1.jpg"I use ‘gallery_files’ because that is the name of my ImageFlow page and ‘gallery_files’ is the name of the folder that iWeb created for me and which contains all of the files for ‘gallery.html’. (This will all become clear I promise).
In the ‘alt’ part of the code you can add whatever text you want and it will appear under each image as a title. if you don’t want a title, leave it blank. Finally you will have to complete the width and height for each thumbnail image. Mine were 240 x 320 so I just entered those numbers in the relevant ‘w’ or ‘h’ part of the code.
Within the first line of the code (in red) you will notice a ‘div id’ is required. Give your ImageFlow gallery a suitable name. If you are having more than one on a page then ‘Gallery 1’, ‘Gallery 2’ etc is suitable, just don’t call it ImageFlow. Remember the name of your gallery however, you will need it later. I called mine ‘portfolio’, which is the same name as the site.

In the image above you can see where I have inserted the ‘src’ links, the ‘alt’ text for the comments and inserted the height and width elements. Thats all of the HTML sorted so save the page and close it.
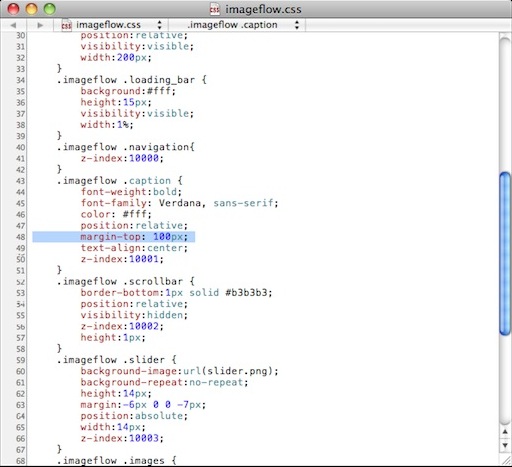
Now navigate into the ‘gallery_files’ folder and find the ‘imageflow.css’ file. Scroll down until you find ‘.imageflow .caption.’ We now need to add a bit of a margin to the top of the captions and as you can see in the image below I have added the code:
margin-top: 100px;
to line 48. I have also added a few extra lines to the same section:
font-family: Verdana, sans-serif;
color: #fff;
This is to make the comments font fit in with the theme I am using (font-family) and to make it show up on a black background I colored the font white (color: etc..). By default the font is Times New Roman in black so you may want to add these lines too.
Finally we have to edit the javascript. Do you remember earlier when you gave the ‘div id’ a unique name? Well now it is time to remember it. Open ‘imageflow.js’ and scroll right down to the bottom of the page where you will see the following bit of code:
domReady(Function()
{
      var instanceOne = new ImageFlow();
      instanceOne.init({ ImageFlowID: 'myImageFlow' }
});
Where it says myImageFlow between the speech marks you need to replace it with your unique name. You also need to add a bit more code to the domReady function. Here is what it should look like, so copy the code below and overwrite the code you have then change the name ‘portfolio’ with your unique name.
domReady(function()
{
 var instanceOne = new ImageFlow();
 instanceOne.init({ ImageFlowID:'portfolio',
reflections: false,
imageFocusM: 1, startID: 3,
imagesHeight: 0.5 });
});

All you have to do is save the file and close your code editor. If you have understood, and followed these instructions you should now have a working coverflow gallery working on your iWeb site. You can test it by opening up your ImageFlow page (ie my ‘gallery.html’) in your favorite browser and scrolling through the images. Test that when you click on one of your images it opens up the new page you made (if it doesn’t you have the link wrong so check the longdesc in the code you added to the page) and that your back to gallery button works.

I hope you managed to follow this tutorial okay, if you have any questions or if you have added the ImageFlow gallery to your iWeb site, why not leave a comment with a link so we can all take a look.
You can get FREE and low-cost iWeb themes from www.themesforiweb.com. Why not take a look.


Dear Tim,
Thank you for this elaborate and great guide. I experimented too with coverflow and finally I found a great program called bannerzest Pro. A creator of flash files and a html code generator for iWeb. It works like a charm, but it’s not as free as your tutorial of course. I used Bannerzest and their coverflow template for my social digital life.
see: http://www.vanbiljouw.com/2009/Ramon.html (@ the bottom of the page).
Cheers, Ramon
Thank you for taking the time to share this info with us. It’s still a little beyond me, but I can follow the concept and your site has been very helpful to me. PLEASE keep up the good work.
Thanks, Dr. George
[…] Read the rest here: How to get a coverflow gallery in iWeb | All About iWeb […]
Tim, hi!
This is a great tool! But, I’ve got a question: I can not see any reflections, nor can I control “startAnimation”, or anything else. Do you know why?
I’ve made those chances in imageflow.js, but it there is no effect.
I hope you can help me with it.
Thanks and all the best . PJ
Hi !
I wanted to write you my personal feedback on this tutorial since I used it on my website (www.vincentchampagne.com — section PHOTOS) and I’m pretty happy with it. However, I have some comments that could further help those who want to try this feature on their site.
1) First of all, it has to be said that whenever you make modifications to the website, you have to re-edit the html code ! To avoid re-typing all the informations on each line, I copied-pasted the “name.of.your.file.html” on a TextEdit document. This way, when I publish my modified website, I just copy-paste the code and save time. It could be fastidious to rewrite 82 times lines like
2) Also, whenever I make a modification and publish the site (to MobileMe), I have to re-upload the thumbnails files and the Finn Rudolph’s files. It take a few minutes.
3) The first time I did this gallery, my thumbnails were too heavy. The loading time was very long. So I had to use Photoshop to lower them down under 100Ko each (or less), wich I was not able to do with “Preview”.
4) In the tutorial, you say: Find the line that starts:
<div id="id3" But actually, depending on what you put on your page, it may not be 'id3', it could be 'id4' or whatever else. So it should be said that it is the 'id' that contains the word 'imageflow' at the fourth line !
5) I wanted to create more than one imageflow on one page, and I have not been able to do that. I dont know enough about programming, so I just followed this tutorial and I wouldnt know how to edit the code to have more than one gallery on one page. Can you tell me ?
Thanks for sharing this tutorial ! I am happy with it !
Vincent
So just did this and it looks cool, But…
Mine is flowing vertically.
Any hints on how to fix this, or what i did wrong?
Thanks for the “How to”
JB
Hi,
Thanks for the “how to”.
I using a white background, but the slider button is also white.
Could someone please tell me where I have to change the “setting”, as I have noticed that there is also a dark slider button??
Rgds,
Thomsen
It is a bit easier to simply use an iFrame and target the coverflow version (called Carousel) of a mobileme slide show you have already set up on Mobileme (assuming you have that of course). Simply go to your mobileme gallery, select the slide show you want, select the Carousel option and lift the complete URL to use in the iFrame code in the HTML Snippet. The URL will look like this: http://yourmobilemepath&view=carouseljs&sel=0
This one was a bit tricky, but I finally got it to work! Thank you so much you did a great job laying out all of the steps for those of us who are new to writing code.
You can check out my finished project here! http://www.jamiecarpp.com/Site/Gallery.html
I would love to find out how to make the reflection work for the pictures please let me know if you find anything out about it. Thanks
-Jamie
Hi!!
I’ve done everything as you explain in this fantastic tutorial… and I have my gallery.html working perfectly, but I don’t have any change into my Iweb page, I mean that into my Iweb project I can’t see the changes…
My project is publish into a folder as I don’t have a FTP or mobileme account yet.
How can I see those changes into my Iweb project window?
Thanks and congrats for this great website mate!!
Hello! I followed the instructions as written, but when I look on my html page, I see the image titles, not the images themselves. Also, there’s no imageflow box showing. Did I put the images in the wrong place? Help!
Hello! I followed your instructions and I actually understood it all! It worked when I opened up my cover page! However, I ran into a problem when I went to open up iWeb it gave me an error code of:
Can’t open file “~/Desktop/imageflow/Site_2/Blank.html.”
Please help me! I really love the way the cover flow looks with the photos.
Thank you so much.
H
am using code and iweb for first time. have gone through your tutorial very carefully but am not seeing anything at all where imageflow is supposed to be.
I cannot publish to web yet but have published to folder on myy mac.
Thought I would be able to see page work on the page in the folder…
Many thanks
Alison
Hi Tim,
I am experimenting with your Coverflow tutorial… It is clear and easy to follow. While I don’t fully understand everything about HTML, I am not a stranger to editing the code. I have done exactly what you stated and I did not get the same results. Instead of having a Coverflow on my Gallery.html page, each of my thumbnail images show up in two columns down the page. I have 18 images, so I have 9 rows with two images each. I’m not even able to click on the image for page with the larger image on it to appear. I’m pretty sure it’s something I did wrong or missed, but I can’t figure out what it is. I have gone through the tutorial several times trying to figure out where I went wrong… Please help…
Hello Tim,
Thanks for the very detailed instructions. Was very much able to follow the steps.
Thanks to Vincent for those tips as well.
Only thing for me now is similar to what Alison mentioned, I too, can see the photos.html page from my local folder show the coverflow, but when I publish it to the site, it doesn’t show anything. Any suggestions?
Thanks!
I love this look and it took me ages to find you , thanks for explaining it.
I am desperate to get this to work
I am the same as the last writer( Dorothy). I have done all the steps and can click on the links and come to the larger image . I cant see my thumb nails yet so I have to check were I went wrong. But when I publish my site it doesn’t show up on my gallery page. Can you explain what I have done wrong.
Thanks