EverWeb has a great, updated Video Widget in version 1.9.5 that can be used to easily add video content to your website. Creating your own video content doesn’t have to be expensive or time consuming as apps such as iMove and Keynote are both free and easy to use. There’s also QuickTime Player, which comes with OS X, that lets you screen record video then edit it with some basic editing features.
In this example, we’re going to create a video tutorial about EverWeb’s hyperlinking feature using Quicktime. The video will include an audio track narrative. Once the video and audio have been created, we’ll insert it into a web page in EverWeb. OK, here we go…
Planning and Preparation
- Before creating a video tutorial, plan it’s flow from start to finish. Keep in mind what the goal is i.e. what do you want to tell your audience?
- Your tutorial should focus on one subject or idea only if at all possible e.g. how to hyperlink a piece of text to take you to another page in your website.
- Try a few ‘dry runs’ to make sure the tutorial flows properly before you start recording. Doing this also helps you get used to the steps you’ll be recording. It’s also a good point to double check that the video flow is as simple and straightforward as you had planned. Remove any unnecessary steps or anything not directly related to what your subject is about.
- Once you have rehearsed your tutorial, close any open applications on your desktop that are not needed in the recording.
- Set your OS X desktop background to a neutral color and clear away any files you have placed on the desktop. This will help keep your audience focused on the video content and not what’s in the background.
- When making screen recordings, you may want to increase the size of the mouse pointer so it’s easier to see and follow around the screen. You can change the mouse cursor size in ‘System Preferences’. Select ‘Accessibility’ and then ‘Display’. When recording, remember to move the mouse at a steady, even pace at all times. Avoid jerky mouse movements and don’t go too fast or too slow either!
- Once you have set up your recording environment, go to the point where you will begin the recoding. In our example, this is the page in our EverWeb Project file with the text that we want to hyperlink.
Recording Your Quicktime Movie
With all of the preparation done, it’s time to start recording…
- Open QuickTime Player. If it’s not in the Dock use Spotlight to search for it.
- Select File > New Screen Recording from the menu and follow the instructions that appear in the middle of the screen.
- When you have finished recording your video tutorial, press the record button in the menu bar in the top right hand corner of the screen to end the screen recording.
- Next, play your recording back to make sure that it’s how you want it. You may need to re-record a couple of times to get things right. Remember that if you need to re-record, you may need to reset things that have changed in the recording e.g. in the example of Hyperlinks, you would deselect ‘Enable as Hyperlink’. If you find that re-recording keeps going wrong, take a break and come back fresh to it later on.
- To add a narrative audio track to your video you’ll need a microphone. This is easily solved by using the microphone included with your mobile phone, such as the one on an iPhone. Plug the microphone in to your Mac. Remember to plan and test your audio track in the same manner as you did with your video track.
- Before starting the audio recording, make sure the video recording is at the start of playback. Also, moving the audio and video windows close to each other will make starting and stopping recording and playback easier.
- Select File > New Audio Recording. Begin the audio recording and then start the video playback immediately afterwards so that your narrative recording syncs up with the actions of the video recording. Once finished, turn off the audio recording and save the audio file.
- To combine the audio with the video, drag the audio recording file you have saved on to the window that contains the video recording.
- If the video is too long, use Edit > Trim to edit it down.
- To edit down the audio track, select Edit > Trim followed by View > Show Audio Track. This will allow you access and edit the audio.
- When you have finished editing, save the video file. It will have a .MOV extension.
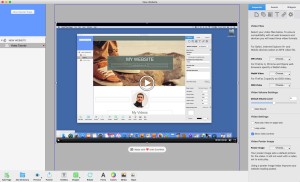
Video Inserted into a web page.
Adding Your Video Content in to EverWeb
With your video tutorial now complete, it’s time to add it in to your web page in EverWeb…
- Open your EverWeb Project file and go to the page where you want to add the video.
- From the Widgets Inspector, drag and drop the Video Widget on to your page. Position and resize the video placeholder as desired.
- In the Video Widget settings tab click the ‘Choose…’ button for ‘MP4 Video’ and select your .MOV video file. You’ll notice that there are two other file format options available: WebM and OGG. Use these options for compatibility purposes with older versions of Firefox and with Opera browsers. If you need to convert from Quicktime’s .MOV file format to WebM or OGG formats look for appropriate conversion programs on the Web.
- The updated Video Widget in EverWeb 1.9.5 has a variety of options for video content (see screenshot above.) Generally it’s recommended to go with the defaults most of the time unless you have specific reasons not to. For example, muting the sound is a good idea incase the video is accessed in a public area where you won’t want sound to upset people who may be nearby.
- It’s recommended to use the Poster Image option as the option places a picture at the front of the video whilst the video itself downloads in the background. It’s useful especially if the video is large and/or download speeds are slow to the device being used. Without a Video Poster Image the video needs to download first to supply an image. The other use of the Poster Image option is that you can easily make a title card for your tutorial, in our example, ‘Hyperlinking with EverWeb.’
- Remember that when using Video Poster Image it isn’t supported with Autoplay checked. You may want to advise your visitors that video downloads can be bandwidth hungry, especially from mobile devices before they hit ‘Play’ so they can choose to play the video or not.
- To see the results, use Preview in the EverWeb Toolbar before publishing to the Internet. Don’t forget that when you publish to the Internet to test your video content in different browsers to ensure video format compatibility.
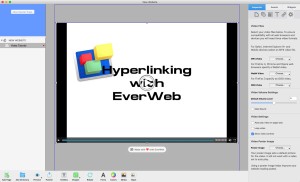
Example Poster Image in EverWeb which can be used as a Title Card for your video.
Adding video content in to your EverWeb Project is quick easy and hassle free, all it takes are OS X’s native or free apps to get you there!


Comments