
 By
By When designing your website with EverWeb, you may sometimes feel the need to separate out parts of your content on the page in a way that gets noticed. Using the Dividers feature is just the kind of option that can make an impact. It’s also one of those features that you don’t really see on other, non-EverWeb made sites, so it’s a way to distinguish your site from the crowd whilst adding subtle styling io it!
What Is a Divider?
As its name implies a Divider can be used either at the top and/or bottom of an object to show that it is distinct from the object above and/or below it. Visually it indicates the beginning or ending of the current section, theme, or topic and the start of the next… You don’t necessarily have to use Dividers in this way though, you can also use them as pure object decorations if you prefer. For example, you could use Dividers on the top and bottom of a TextBox too highlight to your visitor its importance.
Dividers use SVG technology so they’ll be scalable at any resolution. This means that there’s never any degradation in their appearance at any time.
What You Need to Get Started with EverWeb’s Dividers
To get started with using Dividers, you’ll need to be using EverWeb version 3.9 or higher on macOS and version 3.9.1 if you’re running EverWeb for Windows. If you need to update your EverWeb to these versions or to the latest version (recommended) then just click on the File-> Check for Update… menu option on your Mac version, or the Help-> Check for Update… menu option in the Windows version. You’ll be guided as to how you can upgrade.
Case Uses for Using Dividers
Whilst you can use Dividers on almost any object, usually they’re best utilised on Full Width objects. In this way they separate out sections of the page very effectively and clearly. You can also use Dividers for Fixed Width objects as well. This is ideal for when you want to add decoration to your page, or to draw your visitor’s attention to a particular object on the page.
Adding a Divider to An Object
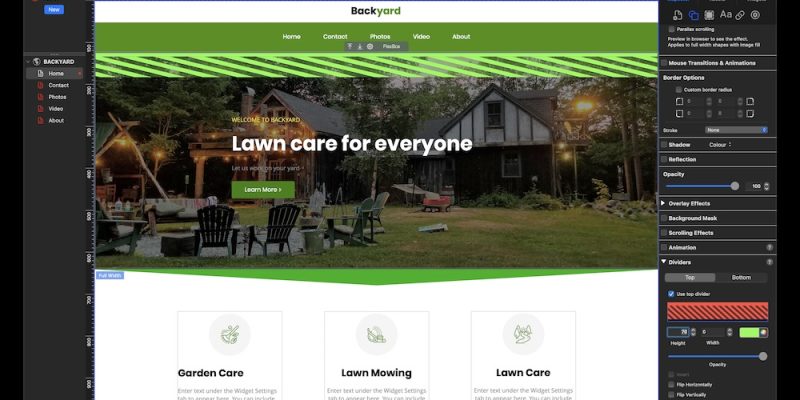
To add a Divider to an object, start by selecting it. Next, go to the Shape Options tab in the Inspector Window. Towards the bottom of the Shape Options, you’ll see the Dividers section. If it is closed, wither click on the word ‘Dividers’, or click on the triangle to the left of it. Either way will open up the Dividers section for use.
You’ll immediately notice that there are two buttons: Top and Bottom with Top being highlighted indicating that the settings for the Top Divider are displayed. Simply click on the Bottom button to see its settings. For the moment, we will leave the Top button selected. You’ll notice that opening the Dividers section doesn’t activate the Dividers settings. You’ll need to click on the ‘Use top/bottom divider’ checkbox below the two buttons to apply a Divider and activate its settings.
Once you have checked the ‘Use…’ checkbox, you’ll see the Divider’s settings activated, but there’s no Divider applied to your object. To remedy this, click in the big box that’s marked ‘Select’. This is where you choose the Divider Style that you want to apply to your object. In total, there are 24 different Divider Styles to choose from. Use the scrollbar on the Divider Styles right hand side to scroll up and down the list of Divider Styles. Once you’ve seen a Divider Style that you want to use, double click on it. Note: If you only single click on a Divider Style, nothing will happen, so double clicking is important to remember.
Styling The Divider
After double clicking on the Divider Style that you want to use, you’ll see if applied to the selected object. If you resize EverWeb’s UI, you’ll notice that the Divider will dynamically resize itself as you increase of decrease the width of the UI.
Now you can change aspects of the Divider using the settings shown beneath the Divider Style box. The first is height. This option lets you set the depth of the Divider in relation to the object it’s attached to. You can choose a height level from 1 to 100. If you set the Height to zero, you’ll see a default height set by EverWeb. There’s also a Width option that you can set from zero to 300. To the right of the Height and Width settings is the Color Swatch and Color Picker which you can use to change the base color of the Divider. Some Divider Styles use more than one color. In this case the Divider will adopt the base color for the main part of the Divider and will use one or more complimentary colors for the other parts of the Divider. In addition to choosing the color you want to use, you can also set the opacity of the Divider using the slider.
Additional options can be applied to the Divider using the Checkbox options at the bottom of the Dividers section. You can invert the Divider, or flip it horizontally or vertically. The Divider can also be placed wither outside or inside the object depending whether you have the ‘Place outside element’ option checked or not. When using this option, you probably will want to also flip the object at the same time. The last option brings the Divider to the front of the object. For example, you may have a Container with a row of shapes in it. If you apply a Divider to the Container, it will be applied behind the shapes. To make the Divider appear on top of the shapes, check the ‘Show above content’ checkbox.
If you want to use Dividers on both the top and bottom of the object, just click on the Bottom (or Top!) button and repeat the procedure outlined above.
Changing and Removing Dividers
If you want to change the style of Divider that you’re using, that’s easy to do. Just double click on the image of the Divider in the Divider Styles box and select a different one. The previous Divider settings will be retained when you do so.
If you want to remove the Divider from the object, simply un-check the “Use top/bottom divider’ checkbox. Simple!
Dividers are a simple, yet versatile way to style objects and sections of your page in unique and bold ways!




 Loading ...

Comments