With all the limelight on EverWeb version 2.0‘s all new blogging environment, you may think that we’ve forgotten about the other new features of new release! Fear not as today we’re going to look at the all new Contact Form Advanced (CFA) widget!
A simple or advanced Contact Form?
The new Contact Form Advanced is an addition to the original Contact Form widget that debuted with EverWeb 1.0. The original widget is very simple and straightforward with few customisation options. It’s great when your requirements are also simple and straightforward.
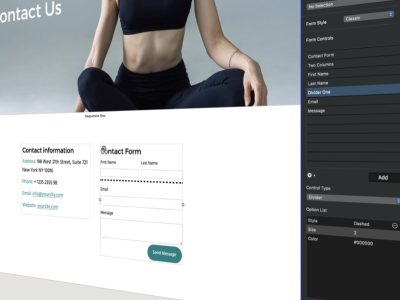
Contact Form Advanced comes in to it’s own when you need more flexibility e.g. you may want to ask about users about their choices or preferences, you may be conducting a survey, or you may need to give users some extra help when they fill out the form. The screenshot below gives an example of just some of what you can do.

In this example, you can see that a drop down menu has been added for age ranges, checkboxes for fruit choice preferences, extra space added between Form Controls and some font styling.
How Contact Form Advanced Works
As with all of EverWeb’s widgets, just drag and drop the CFA widget on to your page. Go to the Widget Settings tab in the Inspector to customize the form. Some settings will be familiar if you have used the original Contact Form widget e.g. ’email address’, ‘Email Subject’, ‘Email Sent Success Message’ and ‘Submit Caption’.
It’s all about Controls
What’s different with the CFA widget is that it uses Form Controls. These are customizable fields you can add, reorder and delete from your form. Each ‘Control’ has its own attributes e.g. click on the ‘Name’ Control in the list. You will see that its Control Type is ‘Text Box’. You can change this to another Control Type either Text Area, Number, Phone Number Date, Drop Down Menu, Checkbox, Radio Button, URL or email address.
When you select a Control Type, the available options depend on the Control Type you’ve chosen. Any options that are not available are greyed out. For example, the TextBox Control Type has the ‘Add Option’ box greyed out. However, ‘Default value’ text is available which is useful for pre-filling the text box itself. For example you can add instructions for your users e.g. a restaurant may add ‘Let us know if you have any food intolerances or allergies here…’ as a default value to guide the user on how to complete the form.
Adding and Using a Form Control
To add a Form Control:
- Click on the ‘Add’ button just under the Form Controls list. Name the new control e.g. ‘Fruit’ and press Enter.
- Next select the Control Type you want e.g. Checkbox from the ‘Control Type’ list.
- The ‘Add Option’ is available for this Control Type so click on it.
- Enter ‘Apple’ as the name and then press Enter.
- Repeat this step to create other types of fruit.
As you change the Control Type and Options the CFA will update dynamically so you always see the changes as you make them. At the end of the checkbox list we included ‘Other’ then added another Form Control underneath ‘Fruit’ so that users can enter in their own fruit choice if there selection does not appear in the checkbox list. The Form Control has a default value applied to it.
Reordering Controls
If you’ve added in Form Controls but find later that they’re in the wrong order, click and drag the Form Control to where you want it then drop it in place. This feature is also used in EverWeb’s Image Slider and Image Gallery widgets. It’s sometimes a bit tricky to do so try first selecting the CFA widget and immediately clicking and dragging the Form Control you want to the place you want it located. It may take a couple of tries to get used to how it works. If it doesn’t work you’ll find yourself editing the name of the Form Control instead.
Enhancing Your Form
One of the great things about CFA is that you can customize Form Controls to produce some great effects. This only takes some very short code snippets that you can add directly into the Control itself. See the screenshot below.
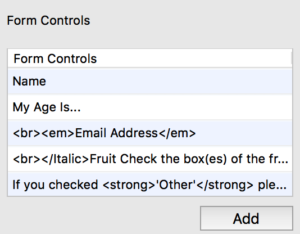
The Form Control section of the CFA widget showing the customizations that have been applied.
Padding Out Form Controls
Form Controls appear directly one after each other so there may be times when you want to give each control a bit more space. To do this just add
before the Form Control label to add two carriage returns to give some extra padding.
Breaking Text
Using
Text Styling
To embolden text in a Form Control label, use followed the text you want to embolden, then to return back to normal text weight.
To use italics, use to start with and to finish.
You can even combine the two e.g. and to create bold italics text.
Test Drive Your Contact Form
Always be careful when you using code in your form! Always test before publishing! For Contact Forms, it’s recommended that you publish a test page to see if the form and any styling (and code) works as expected before you publish a live form. You can use EverWeb’s Preview, but it doesn’t allow you to test ‘send’ and ‘receive’ functionality of the form as both CFA (and the regular Contact Form) use an email address to do this. Therefore, it’s best to publish a test page first.
Finally, if you have EverWeb version 2.0, remember there’s an upgrade to 2.0.2 which includes some fixes to glitches in the initial release of Contact Form Advanced. And don’t forget that if CFA doesn’t fit the bill for your requirements there’s always the EverWebCodeBox that’s full of third party widgets that may help you out.
The new CFA expands the capabilities of the original Contact Form and is a great addition to EverWeb. We’re looking forward to more feature adds to CFA in the future!
In the meantime, if you have a question, comment, or some hints and tips let us know below! Thanks!


Comments