If you use EverWeb’s blogging feature in your website, the recently released EverWeb version 3.0 give you a couple of great new features to make your visitor’s experience even better. The first new feature is the ‘Image Cover’ Style option that lets you add a ‘Hero’ image to posts listed in your blog main and archive pages.
The second new feature for blogging lets you add index pagination to the blog main and archive pages. This new feature allows your visitors to more easily navigate blog posts from the blog main or archive pages. Blog pagination is extremely customizable so you can tailor it to your own site’s needs. Here’s how…
A Blog Pagination Scenario
To start, make sure that you have a sufficient number of blog posts created to enable blog pagination to work. Basically this means that you should think about how many blog posts you want to display at any one time on the blog main page. For example you may want only 10 posts to be visible at any one time. For pagination to work, you will need at least 11 blog posts on in your blog posts page.
The next step is to think about how many posts out of the total number of blog posts that you have in the blog posts page do you want your site visitors to be able to access. As an example, you may have created and published 40 blog posts in your blog, but you only want your visitors to access the last 30 posts.
In this example, using blog pagination would mean that I would have a blog main page that displays the latest 10 blog posts on page 1 of the pagination, with the remaining 20 posts accessible on page 2 and 3 of the pagination. I would never see the first 10 blogs that I have created as I only want to see the latest 30 blog posts from the total of 40 in my blog posts page.
Setting Up Blog Pagination for Your Website
Now that I have figured out how I want my blog pagination to look, the next step is to put my scenario in to practice. Here are the steps used to create the pagination in EverWeb:
- The first step is to create a blog in the EverWeb Project file. This can be either a fixed width blog or a responsive blog. Use the Add page button in EverWeb’s Toolbar to add a page to your site. use the blank or responsive blank Theme Template and choose the ‘blog’ page style. If you are using an EverWeb Theme Template, check to see if the template has a blog page style available. If not use the blog page from the blank (responsive) Theme Template.
- The blog will bar added to your project file. Add your blog posts to the blog posts page. In my example, I created 40 blog posts.
- You can add blog pagination to the blog main and/or archive page. In my example, I am going to add the pagination only to the blog main page so I select this page in the Web Page List.
- To activate the blog pagination, double click on the blog main widget as this is the widget that displays the blog posts on the page. Double clicking on the widget will make the Widget Settings tab display in the Inspector Window.
- The first field to update is ‘Total Number of Posts’ field which is where you set the number of posts out of the total blog posts that you want your visitor to be able to see. In my example, that’s 30 out of a total of 40. Once I have entered ’30’, the widget will update automatically.
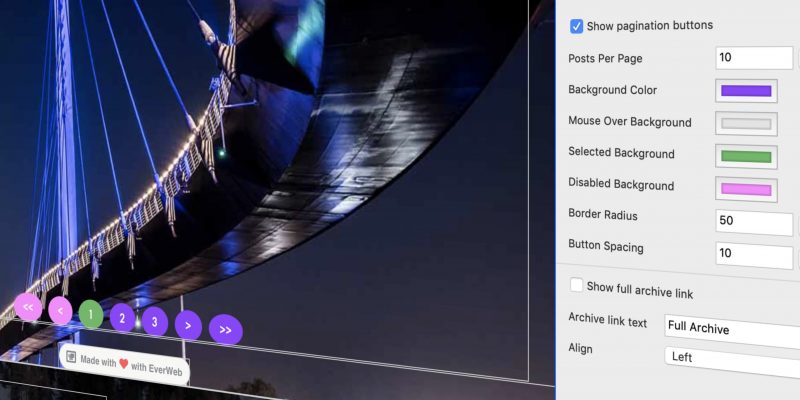
- now go to the Pagination Options section and check ‘Show Pagination Buttons’ so that the pagination options can be used.
- In the ‘Display Posts’ field, I enter 10 and the widget will again update to display pagination buttons at the bottom of the widget.
- The pagination controls are like that of a media player. The first button on the left takes you to the first page of the pagination, the last button on the right takes you to the last page. The second button to the left and second button from the right take you to the next and previous pages in the pagination respectively. Finally, in the middle are numbered page buttons. In my example, I have pages 1, 2 and 3.
Customization of the Blog Post Pagination
As the pagination buttons are now in place, I can customize them to match the look of my website. The options in the Widget Settings are self explanatory. You will sometimes have buttons in the pagination that are not available so you can distinguish these using the ‘Disabled Background’ field e.g. if you are on the very first page of the blog pagination, you won’t be able to access the ‘go to first page in the pagination’ button or the ‘previous page’ buttons.
If you want to change the roundness of the pagination button, change the value of the ‘Border Radius’ field. For completely rectangular shape buttons set the value to zero, whilst for elliptical shape buttons, use a value of 50 which is the maximum you can input.
You can also change the font, font size and font style of the pagination buttons. This is achieved in exactly the same way as you would change any of the other fields in the blog main widget. Double click on the pagination buttons to highlight them, then click on the Fonts button in the Toolbar to access the Fonts Panel. Apply the styling as you want. You may also want to change the spacing of the buttons using the Button Spacing field which allows you to input values from 0 (no spacing) to 99 (as wide as the widget).
After customizing the widget, use Preview to test the pagination before publishing your site.
Troubleshooting Blog Pagination
If you find that you do not see the blog pagination buttons when you have set up your blog pagination options, there are a couple of things to try…
- The value of the ‘Total Number of Posts’ field should beless than or equal to the number of actual posts in the posts page.
- The ‘Posts per Page’ value must be at least two less than the ‘Total Number of Posts’ value.
EverWeb YouTube Video
A video tutorial of Blog Pagination in EverWeb is also available on YouTube.
If you’ve got a question on this blog feature, please let us know below in the Comments Section! Thanks!


Comments