The recently released EverWeb 3.0 is a huge update, packed with key features such as the all new Contact Form Enhanced add-on that lets you retain contact form information when using the Contact Form Advanced widget in your website and the addon also allows visitors to upload files to you securely. There’s also improvements to the Contact Form Advanced widget itself with reCAPTCHA support to help stop spam, a new place holder field, text file importing for list creation, and the ability to choose multiple selection in list boxes.
One of the other great new features of EverWeb 3.0 is a completely revised Assets List that is much faster and responsive than before and which adds the key improvement of user defined folders so you can organize your assets as you please!
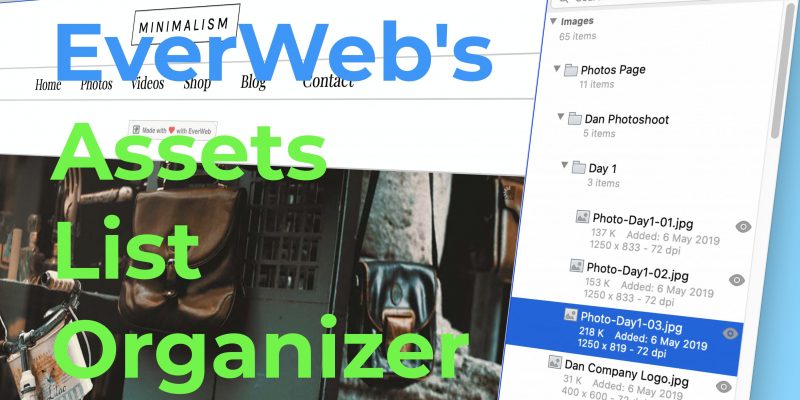
Why Use the Assets List Organizer?
EverWeb’s new Assets List Organizer is ideal for organizing your project’s assets . For example, you may want to group assets so to mimic the page structure of your website. The Assets List Organizer also allows you to add sub-folders so there’s not problem if you want to create a hierarchy of folders. You may also want to organza assets by type or by theme e.g. you may have audio files or video clips that you want specifically grouped together. The Assets List Organizer is perfect for both image files and ‘External’ assets. If you have a project file containing a large number of assets the Assets List Organizer gives you an easier way to find assets by grouping similar assets together.
What’s Changed in the Assets List in EverWeb 3.0?
The main change in the Assets List in EverWeb 3.0 is that the search bar has been slightly shortened to make room for three new buttons: The ‘+’ button lets you add a folder to the Assets List, the ‘-‘ button is used to delete a folder from the Assets List and the Settings Cog replaces the up/down arrows used in prior versions of EverWeb. The Settings Cog is used to sort assets by name, file size or date added. It also allows you to toggle the display of file information on and off and is where you can find any assets that are not being used by your project file so you can delete them if you want to.
The Assets List Organizer has the same look and feel as the Widgets Organizer that debuted with EverWeb version 2.8.
Adding a Folder Using the Assets List Organizer
To add a folder to the Assets List, first click on the Assets tab if you haven’t done so already. You can create a new folder immediately by clicking on the ‘+’ button in the Assets List Organizer. However, before you do, be aware that the folder will be created at the location of the currently selected folder or asset. So, before pressing the ‘+’ button, select where you want to create the folder, e.g. to create a folder at the top level of the Images section of the Assets List, click on the word ‘Images’ which will select the top level.
Click on the ‘+’ button and enter a name for the new folder. You can use letters, numbers and a some special characters. If you enter characters that are not allowed, EverWeb will strip them out. Click ‘OK’ to finish. Remember as well that each folder name must be unique. If you try to create a folder name that already exists, EverWeb will ask you to change the name so it is unique.
To create a folder inside an existing folder in the Images section, click on the folder that you want the new folder to be created within, then click on the ‘+’ button. Name the folder and click OK. The folder will be created inside the selected folder.
If you want to create a folder in the ‘External Files’ section, use exactly the same method as described above but within the External Files section of the Assets List.
Displaying Folders
When you add a new folder it will be not contain any assets or subfolders. The folder is also displayed ‘closed’, with the triangle symbol to the left of the folder name pointing to the right, towards the folder name. Click on the triangle to toggle the folder view open or closed, in the same was as you do with directories in the Web Page List. When the folder is open, the triangle points downwards with its contents displayed.
Renaming a Folder
If you want to rename a folder, just double click on its name and edit the name as you want. Press ‘Enter’ when finished.
Working with Assets and Folders
Working with assets in the Assets List uses the same approach as with everything else in EverWeb: Just drag and drop! Drag the asset you want from its current location in the Assets List and drop it on top of the folder where you want to moved to. The file will be added to the folder. If the folder is open, just can drag and drop the file on top of the files within the folder.
If adding assets from outside of EverWeb in to the Assets List, just drag and drop the files from their source location on to the folder you want them placed in, within the Assets List.
Moving Assets and Folders
As already mentioned above, moving assets is just a matter of drag and dropping it from one location to another. If you want to move a file out of a folder, however, you will need to drag it to the left of the triangle symbol. This will place the asset one level above the folder that it came from. If you need to move an asset back to the top level (i.e. the Images or External Files level), make sure that you move the file to the left of the left most triangle symbol.
If you want to move a subfolder, just drag and drop it to its new location.
The examples so far have been related to adding or moving only one asset at a time. You can also move multiple assets from one location or folder, to another location or folder. If the assets you want to move are listed continuously one after each other in the Assets List, click on the first asset in the list, then Shift+Click on the last asset. All of the assets from first to last will become highlighted. Drag and drop the highlighted assets to their new location or folder.
If you want to move assets that are in different locations within the Assets List, click on the first asset you want to move, then Command+Click on each of the other assets you want to select to move. When finished, drag and drop the selected assets in to the folder, or location, where want you them.
Deleting Folders
There are three ways in which you can delete a folder from the Assets List. Start by highlighting the folder you want to delete then either:
- Click on the ‘-‘ button in the Assets List Organizer,
- Press the backspace key or
- Secondary click on the folder and select ‘Delete Folder’ from the list of options.
Whichever way you choose, a dialog box will appear with options to either ‘Delete Folder & Contents’, ‘Delete Folders Only’ or ‘Cancel’. Select the option of your choice. If you select ‘Delete Folders Only’, any assets within the folder will be automatically moved to the next folder level up in the Assets List.
EverWeb’s Asset List Organizer makes organizing your project file quick easy and simple! Let us know what you think in the Comments Section below!


Comments