EverWeb introduced Scroll Position back in version 2.6 as a feature whereby you could set up anchors that could be hyperlinked to in your pages. Instead of hyperlinking just to a particular page, you could now hyperlink to a specific place on a page.
At the time, EverWeb only catered for fixed width page layouts such as the centered and left aligned page layout styles. The ‘dynamic’ page layout was never really used. As such, Scroll Position did not work for the new responsive page layout which was introduced in EverWeb 3.0, replacing the ‘dynamic’ page layout. That is, until now!
The recently released EverWeb 3.2 addresses this issue with the new ‘Set Shape as Scroll Position’ feature.
Scroll Position Becomes ‘Insert Fixed Scroll Position’
You may have noticed that when clicking on Scroll Position in the Toolbar, or accessing it via the Insert Menu, there are now two options available. The original ‘Scroll Position’ has been renamed to ‘Insert Fixed Scroll Position’. It still works as before but the new name makes it clear that it’s for use only with centered or left aligned fixed width page layouts.
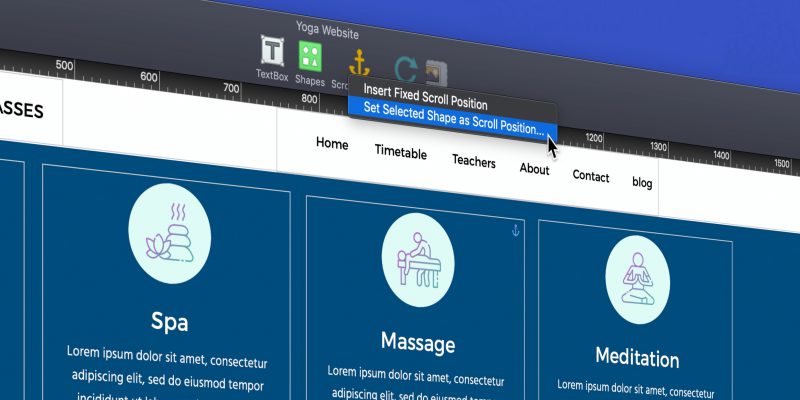
Introducing ‘Set Selected Shape as Scroll Position’
The second option in the Scroll Position Toolbar button is the new ‘Set Selected Shape as Scroll Position…’ option, which is also available from the Insert menu.
A key point about Set Selected Shape as Scroll Position is that it can be used on both Fixed Width and Responsive page layouts. To use the new feature, simply select the shape that you want to add a scroll position to then click on Set Shape as Scroll Position… from the Toolbar or Insert Menu. Set Shape as Scroll Position can also be applied to widgets such as the FlexBox, or Responsive Row, widgets.
Once you have clicked on Set Shape as Scroll Position, a dialog box will appear. This is where you name the Scroll Position. The name must be unique to the page that it is on. This means that you can use the same Scroll Position name in different pages. Click on the ‘OK’ button when you’re finished.
When you add a Set Shape as Scroll Position to a shape, a blue anchor symbol appears in the top right hand corner of the shape so that you know that there’s a Scroll Position attached. Now that you’ve set up your shape as a Scroll Position, you can use it in the Hyperlinks Inspector.
How to Edit, or Delete, a Set Shape as Scroll Position
You can change the Set Shape as Scroll Position name by using the new Scroll Position section in the Shape Options tab of the Inspector Window. First select the shape that has the anchor symbol in its top right hand corner. In the Shape Option tab, change the name of the Scroll Position as you want.
If you want to delete the Set Shape as Scroll Position from the shape, just delete its name in the Scroll Position section. The anchor symbol in the shape will disappear.
How to Edit, or Delete a Fixed Scroll Position
If you’re used to using Fixed Scroll Position, you’ll probably notice that editing and deleting Set Shape as Scroll position works in a different way to Fixed Scroll Position. To edit the scroll position name for a Fixed Scroll Position, you select the scroll postion line then use the Widget Settings tab to change the name. To delete a Fixed Scroll Position, you highlight the Scroll Position line then press the backspace key on your keyboard.
The difference in methods comes down to the fact that Set Shape as Scroll Position uses the shape as an anchor. Shapes, and objects such as widgets, typically have their own Widget Settings, so for this feature the logical place for renaming or deleting the Set Shape as Scroll Position is on the Shape Options tab.
Set Shape as Scroll Position in Use!
After setting up your shape using Set Shape as Scroll Position, attach it to a hyperlinked object just as you would hyperlink any other object. For example, if you’ve created a button on your page, make sure it’s selected. Next go to the Hyperlinks tab in the Inspector Window. Check ‘Enable as Hyperlink’ box to give you access to the Hyperlinking settings. In the ‘Page field’ select the page that has Set Shape as Scroll Position. Next, click on the Position field and select the Set Shape as Scroll Position name that you set up earlier. That’s all you need to do! Use EverWeb’s Preview to test that the hyperlinked button goes to the Set Shape as Scroll Position location as desired.
Summary and Recommendations
EverWeb’s new Set Shape as Scroll Position now lets you use anchors in responsive pages in your website. The other advantage is that it can also be used in Fixed Width Page Layouts as well. We would recommend using Set Shape as Scroll Position even if you are using only Fixed Width page layouts. If you decide later on to convert your Fixed Width Page Layout to a Responsive Page Layout, you won’t have to learn how to setup Scroll Position again if you’re already using Set Shape as Scroll Position!
If you have a question about this blog post please let us know in the Comments Section, we’re happy to help!


Comments