
In the first blog post in this series, we looked at the reasons as to why you may want to split one EverWeb Project file in to two or more smaller project files. We also looked at reasons as to why this approach may not be suitable for all scenarios.
In the second blog post on this topic, we got to work, duplicating the original Project file into three Project files, then stripping content and pages from each file. At the end of the blog post we had three Project files: Artwork which is the main Project file, and Galleries which contains mostly images from art exhibitions, and Blog which contains the website’s blog.
In this post, we will look at how we can link the three project files together and how to maintain the new website structure in future.
All About Redirection
The most important part of using multiple project files to make your website is that you need to make sure that the links between each part of the site are set up and maintained correctly.
- Internal Linking: Hyperlinking text and other objects to pages within the same project file is as easy as you would expect, just go to the Hyperlinks Inspector, check the ‘Enable as Hyperlink’ box, then select ‘One of My Pages’ from the first drop down menu, then choose the page you want to link to from the Pages field.
- External Linking: Use links to external pages when you are accessing pages from another project file. In this case, the first dropdown menu option in the Hyperlinks Inspector should be set to ‘An External Page’. You will then need to enter in the exact URL of the page you want to link to in the URL field. It is, therefore, important that you are properly acquainted with your website’s structure and how the URL’s of each project file are formed.
- Linking the Navigation Menu: This is perhaps the most complicated task you will need to do and you will need to do this in each project file if you are using the Navigation Menu widget. As already discussed, you should have kept your menu structure in each project file. For example, you would have kept the structure of the Galleries directory and its pages in tact in the main project file, but left the contents of each page blank. These pages are then used as the basis of a redirection to the corresponding pages in the Galleries project file. In the Page Settings tab, enter the following code in the Head Code field:
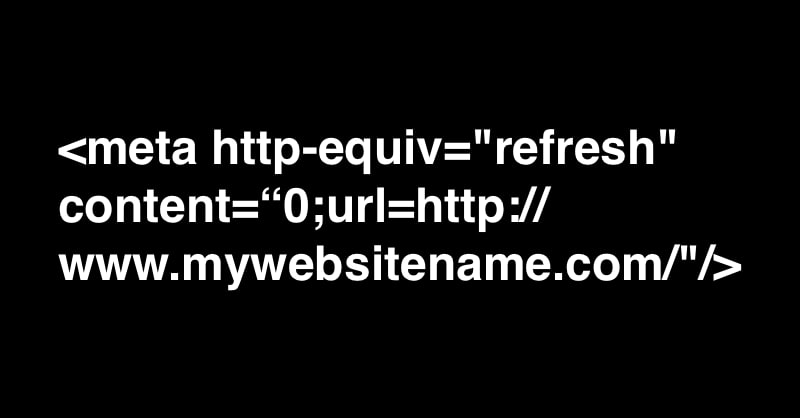
(Source: https://www.quackit.com/html/codes/meta_refresh.cfm)
Replace the URL with the URL to the page that you want, egg, in this example, the Galleries directory page in the Galleries Project file.
Repeat this process for all the menu items that require redirection.
Publishing!
Once you have completed all of the redirects to and from each project file, now is the time to publish all of the project files. Before doing so, make sure that you have correctly set up the subdirectories in the Sire Publishing Settings of the relevant project files, e.g. in this example, there would be a blog subdirectory set up for the Blog project file and a Galleries subdirectory for the Galleries Project file. This directory structure mimics the original structure of the original project file.
As we have preserved the structure of the original site, there should not be any need to remove the existing published site, as the new content should overwrite the old. You may want to consider deleting the original site and republishing the whole website again if you have decided to create a new structure for your website. Be aware that this will mean taking your site of line whilst you delete the old contents and publish the new content.
Once you are ready, start by publishing the main Project file first, then one of the new project files e.g. the Galleries Project file. Test to see that the links are working, then publish the next Project file (in this case the blog Project file). Again test to see that all of the links are working.
If everything is working, delete any content and any unused assets in each project file to reduce the size of each Project file.
The final step is to retest all of the links in your published site to ensure that they all work properly.
Maintenance Work
Using this approach should work easily going forward and you should be able to add content easily using each smaller project file as and when you need to. The real maintenance issue will only come if you decide to reorganise the location of your directories and pages which may require you to re-link the pages in each project file to reflect the new page and folder locations.
Apart from making sure that your links are maintained, you will also need to make sure that any design changes you make to your website are carried through to all of the indiviual project files to ensure continuity.
Conclusions
Deciding to split up a large Project file in to smaller ones can definitely have practical application and may help you speed up your editing and publishing times. This approach should be through through carefully as it does require considerable set up and work to link each project file together to get a seamless looking website at the end.


Comments