When you first start using EverWeb as your website builder you will have created an EverWeb account. This is a simple process to do and helps you log in to EverWeb in EverWeb-> Preferences when using EverWeb for Mac, or in Edit-> Options when using EverWeb for Windows. Typically, you will also only need to do this just once if you click on the ‘Add to Keychain’ option on EverWeb for Mac, or ‘Save Password’ option in EverWeb for Windows.
Your EverWeb account, however, also gives you access to EverWeb’s Client Area. The Client Area is like a backend for EverWeb where you manage many aspects of the product. In this post, we’re going to look at some of the core features of EverWeb’s Client Area!
Accessing Your EverWeb Client Area
Before we get started, of course you will want to know how you can access your EverWeb Client Area. Simply go to the following URL
https://billing.ragesw.com/clientarea.php
Next, just use your EverWeb Account details to login. It’s that simple. Now on to the Client Area’s features…
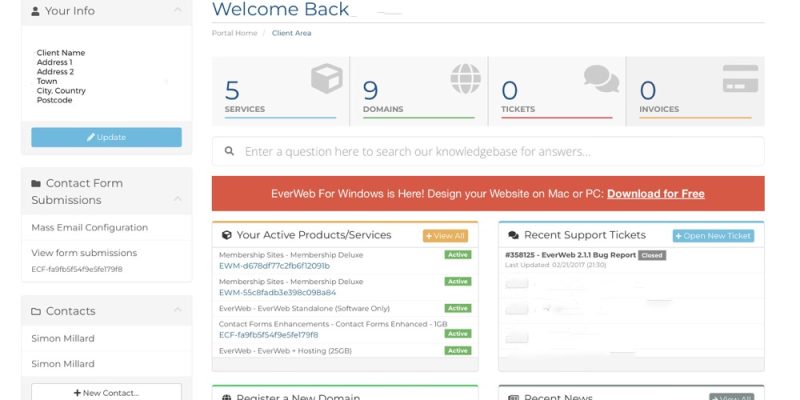
- Administration Tools: Once you have logged in to your EverWeb Client Area, the first screen you see will be your Client Area Home screen. This shows you all of the EverWeb services that you currently have purchased. Detailed information is available by clicking on one of the summary boxes at the top of the screen e.g. Services, Domains, Tickets or Invoices. In the top left of the screen you can also edit and update your own details from the ‘Your Info’ box. If you have purchased EverWeb’s Contact Forms Enhanced addon, check out the Contact Form Submissions section. You will also see down the left hand column the Membership Sites section which is where you can setup all of your backend features of Membership Sites when it launches with the soon to be released EverWeb 4.0.
- Services: If you click on the Services button at the top of the Client Area Home screen, you will se a list of the products and services that you have purchased. If you click on the EverWeb product that you have purchased, you will be taken to a summary page for the service. From here you can use the menu down the left hand side to download your version of EverWeb again if you need to do so. Additionally, this screen is also where you can upgrade or downgrade your EverWeb product, including a cancellation option. You can also login to your Webmail by clicking on the option in the ‘One Click Login’ section.
- Domain Management: If you click on the Domains button from the Client Area Home Screen, you will see a list of all of your domains and their current status. Click on the down arrow to the right of the Spanner symbol for the domain that you are interested in. A list of domain management options will display from which you can choose, or click away from to cancel. For further domain features, go back to the Client Area Home Screen, by clicking on the Home menu option. Then click on the Services button and choose the EverWeb Product you are have purchased. On the Manage Product screen you now have menu options for add-on domains, sub domains and Email account management. If you want to search for, purchase, transfer or register a domain, use the Domains menu option at the top of the screen.
- Tickets and Invoices Buttons: The last two buttons on the Client Area Home Screen are fairly self explanatory. The Tickets button shows you the Support Tickets that you have logged with the EverWeb Support Team. The Invoices button shows you the invoices that have been generated related to your EverWeb purchases and their current status. You can order both the Support Tickets and Invoices list by clicking on the field you want to order by at the top of the list.
Other Important EverWeb Client Area Features
There are more important, good to know about, features to discover in EverWeb’s Client Area…
- Unblock IP Address: If you find that your IP Address has been blocked this may stop you from publishing or using other EverWeb related features. You can unblock the IP Address through your Client Area. Use the Support-> Unblock IP Address feature. This will check your IP Addresss for blocks and unblock the IP Address if necessary.
- Knowledgeable: EverWeb’s Client Area has a great knowledge base about all things to do with EverWeb fro the Support-> Knowledgeable menu option. It’s a great option to quickly solve many problems or issues. If the knowledge base doesn’t have what you need, you can always open a ticket with Support.
- Open Ticket: You can open a new support, sales or hosting ticket with the Open Ticket menu option. Easy and simple!
- EverWeb’s Discussion Forum: Connect with the EverWeb community and also find out what is going on in the world of EverWeb via the Support-? Discussion Forum menu option.
- Download EverWeb Beta Products: If you are interested in trying out beta versions of EverWeb you can do so, just click on the Support-> Downloads menu option then select the EverWeb Beta option. Here you’ll find the latest betas for EverWeb for Mac and for Windows. Currently the betas for EverWeb 4.0 are available there.
- Additional Product Purchases: EverWeb has a number of add-ons such as Contact Forms Enhanced, EverWeb SEO Power Up and Site Shield. Additionally you can also upgrade your EverWeb products if you need to. Simply click on the Services-> Order New Services menu option. You will be taken to the ‘Select Your Plan’ screen. Down the left hand side of this screen will be other options for all of EverWeb’s Services and Addon Products. Select the product or service you are interested in to see all of its details.
EverWeb’s Client Area has many great features and services available, with more coming with the upcoming introduction of Membership Sites in EverWeb 4.0 which should be out in the very near future!
If you have a question about EverWeb’s Client Area, or about anything EverWeb, please let us know in the Comments below!


Comments