The January 2024 release of EverWeb 4.1 has brought a number of user requested features to EverWeb, for example, WebP format, Lazy Loading and Video Page Backgrounds. One of the lesser known feature additions, however, is an equally important one – Do Not Publish.
What Is Do Not Publish?
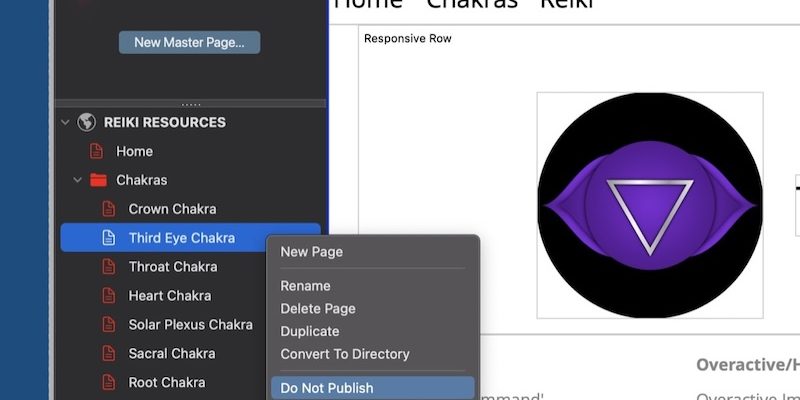
EverWeb’s new Do Not Publish feature should be used for pages, as its name suggests, that you do not yet want to publish to the Internet. To use the feature, simply secondary, or right click, on a page you do not want published in the Web Page List. Select ‘Do Not Publish’ from the menu and you’re all set! You’ll notice that the page name in the Web Page List will become dark grey and the icon turns to a dark red color. It’s subtle but also distinctive so it should be easy to recognise this type of page.
To set the page for publishing, again right, or secondary click on the page that has been set to Do Not Publish. Next, click again on Do Not Publish in the menu to clear the checkmark against it. You will now see the page name return to a light grey color and the page icon becomes a brighter red color again, if the page has been changed since it was last published. If the page has not changed since it was last published the text and page icon will appear in a light grey color.
When To Use Do Not Publish
Obviously you will be using Do Not Publish for the pages that you do not want to publish yet, so for example, the pages that you are working on that are not yet complete. You may also want to not publish pages that you have published, but are now in the process of updating, so you don’t want to republish the page yet until your updates are complete.
The other time where you will probably not want to publish a page is, for example, if you have a page in your site that you use as a site reference e.g. you may have a page that contains information about who created the site, when the site was created, the purpose of the site or any other useful notes that you want to keep in your project file, but don’t want, or need, to have published to the Internet.
What’s Good To Know When Using Do Not Publish
When using the Do Not Publish feature, be careful about not publishing pages that are attached to a Navigation Menu. For example, if you have created a new page that you don’t want to publish, make sure that you uncheck the ‘Include Page in Navigation Menu’ option in the Page Settings tab of the Inspector Window before you publish your site. If you don’t do this, you will see the page in the navigation, but clicking on the page will cause a page not found error.
The second point to bear in mind is that if you have already published pages that you later set to Do Not Publish, the originally published page will remain on the Internet. Setting Do Not Publish will not take a page that has already been published off line. If you need to take a page down altogether, please contact EverWeb Customer Support, or your hosting provider who can do this for you.
Using Draft Mode When You Don’t Want To Publish Blog Posts
Whilst Do Not Publish is a new EverWeb feature for regular pages, blog posts have had this feature since EverWeb 2.8. If you have blog and want to set a page to not publish, simply click on the Posts page in the Web Page List, then select your blog post in the Blog Post List. Check the Draft mode box for the post that you don’t want to publish. Toggle Draft mode off when you’re ready to publish!


Comments