The recently released EverWeb version 3.9 adds a new widget the 25 default ones that come with the product. The new Stripe Payments Widget (also available in EverWeb for Windows 3.9.1, joins PayPal in enabling you to add shopping cart features to your website! If you don’t use PayPal or Stripe, don’t forget that EverWeb also easily integrates with other payment providers such as ECWID and EJunkie. If you need to integrate with another payments provider let us know in the Comments Section below and we’ll do our best to give you advice on how to do it!
All About Stripe
Stripe is an Irish-American financial services business that offers Internet Payment Services to large scale businesses down to individuals and start-ups. Stripe supports payment services through websites and mobile apps via their own API which can be used by app developers. Stripe has a global reach servicing millions of customer interactions per day worldwide.
Setting Up Stripe
Before you start using the Stripe Payments Widget in EverWeb, you will need to create your own Stripe account if you don’t already have one. Alternatively, you can just add the Stripe Payments widget to your page in EverWeb then click on the ‘Create Stripe Account…’ button to create your Stripe account.
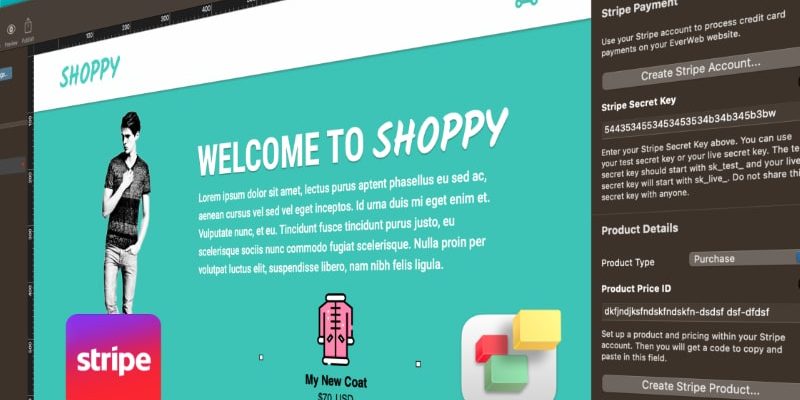
Once you have an account, you can add the products and subscriptions that you want to sell within Stripe itself. There are a few of important things that you will need to make note of in Stripe so that you can easily use the Stripe Payments Widget in EverWeb:
- Stripe Secret Key: When you create your account in Stripe, a ‘Secret Key’ is created as well. This is essentially the password used for your account access. It’s important that you know how to access the key as you will need to use this in the widget later on.
- API Code: This is the unique code that is attached to each product or subscription that you create. You will use this code for each product or subscription that you add in to your Stripe Payments Widget
- Prices and Currency: When you use the Stripe Payments Widget you will enter the price and currency of the product/subscription you are adding in to the widget. Make sure that this information matches with the information that you have added in to Stripe.
- Images and Descriptions: As you can add images related to your products and subscriptions in to the widget, make sure you know where the original image files are so you can easily copy the Stripe image. If you have a description of your product in Stripe, you can also just copy and paste this over in to the widget too.
- Creating New Products and Shipping Rules: Typically you’ll create your products and subscriptions in Stripe itself, but if you are using the Stripe Payments widget and realise that you need to add an extra product in to Stripe, there’s an easy linking button in the widget which will take you directly to the add a new product/subscription page in your Stripe account. The same is also true if you need to add a new shipping rule to your Stripe account.
All About EverWeb’s New Stripe Payments Widget
After creating your products, subscriptions and shipping rules if you need them, it’s time to add these to the page(s) in your website! And a you would expect, it’s EverWeb easy! Just launch EverWeb, select the website project file that you want to use, then go to the page where you want to add in the Stripe Payments Widget. Click on the Widgets tab in the Inspector Window then drag and drop the Stripe Payments widget to where you want it to be on the page.
The widget can be used as a full width object on both responsive and fixed width pages. It can also be used as a fixed width object too. If you want to use the widget as a fixed width object in a Responsive page, remember to add a Responsive Row widget to the page first then drag and drop the Stripe Payments widget into the Responsive Row afterwards.
The first step in using the Stripe Payments widget is to add you Secret Key into the widget. For practical purposes you may want to keep the Stripe app open in a browser window as it will make copying over this key, and other product and subscription keys and info easier to manage. When adding the product price in to the Widget, you can also add in the currency symbol as well if desired. Finally remember that you will need to use one Stipe widget per product/subscription.
The fields in the widget are basically self explanatory so the main thing you probably need to remember is to make sure that you match up the details in Stripe with those in the widget for the product/subscription you are adding. Usefully, the widget includes options for you to add ‘Thank You’ and ‘Cancel’ pages within your site. adding these pages to your site and linking them to the widget will ensure that your shopper will remain in your site. After the shopper has completed the purchase, they will be directed automatically to your ‘Thank You’ page. You may just want to have one generic page, or alternatively you may want to create a Thank You page for each specific product which, although taking more time, will be more customer friendly then a generic Thank You page. If the shopper cancels their purchase, then the ‘Cancel’ page will automatically be displayed.
Final Steps…
Once you have completed adding your product or subscription, you can preview your page before publishing it to the Internet.
if you have any question about this post, please let us know in the Comments Section below, we’re happy to help!


Comments