Without a shadow of a doubt one of (if not the) the most common uses for iWeb is to produce a portfolio web site for photographers. Whether or not an inordinate amount of people in the photography trade use Macs I am not sure but they certainly do like to pick iWeb as there tool of choice for creating their online presence. I’ve seen hundreds of them.
With iWeb you get a variety of ways to present your photographs or any other images. There is the ubiquitous default Photo page and if you have absolutely hundreds then you can even use the My Albums page.
The My Photos page is the simplest way I can imagine to get your pics online. Just drag and drop all of your photos into iWeb, arrange them nicely onto a page and publish your site; that’s it. You can allow a visitor to your site to watch a slideshow or even download your images if you so desire.
I have used this default page on several iWeb sites and, although it is easy to use, I have found that it can be a little slow once it is live on the Internet. To get round that I have been investigating other methods of displaying images that can be incorporated into iWeb that would take advantage of the more modern web design technologies such as CSS3 and HTML5 and this is what I have come up with; an interactive Polaroid style image viewer.
Ordinarily and in keeping with the theme of the site I would have used the Nivo Slider tutorial I ran on All About iWeb in April and used a landscape image of an iMac as the background. As I have already published a tutorial for Nivo Slider I thought I would show you something different.
The Polaroid image viewer is all incorporated within an HTML snippet. When a visitor to the site rolls-over one of the photographs with their cursor it moves to the front of the stack and then enlarges on screen for a better view. There’s no JQuery or javascript (which is better for SEO), it’s all done with CSS and HTML. Here are some before and after shots so you can get the idea.
Before the roll-over
With image roll-over.
It’s all done with a nice smooth transition too so it looks really cool. You can download all of the code (open the file ‘iweb gallery.html in an HTML editor to see the code) and complete (and I mean complete) instructions on customizing the code to suit your iWeb site from the link at the bottom of this page.
You really can change almost everything from the size of the images before and after the scroll, the tilt angles, the shadows, how fast you want the transition from small to big; it’s amazing what you can do with CSS3. Like I said I have included detailed instructions along with the code so you can add this to your iWeb site.
One thing I would recommend, because it makes life soooo much easier (and if I am honest I wish I had thought about it along time ago) is get yourself a Flickr account and upload your photos there. The reasons are twofold;
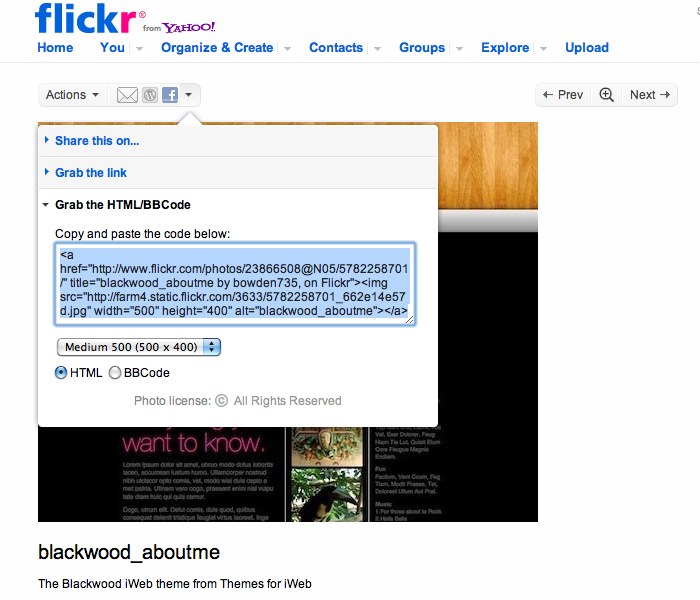
1. When you want to upload new photos to your gallery there is no having to work out what the correct iWeb URL will be to the image. Simply upload the image to Flickr, view the image and the get the embed code (there is a sharing icon above each photo which you can click to get the code-see the image below). This is the code you paste into your site, easy as that.
2. Search engines spiders crawl sites like Flickr and when you upload your photos (which have been named properly of course) and add plenty of keyword rich tags you are helping your SEO. Think about it. If someone uses Google to search for an image and one of yours comes up in the image search because they used your keywords they will go to your Flickr page which in turn could take them to your site. It’s all good!
A bit more on image SEO
I mentioned back on Day 2 about the importance of naming your photos correctly and you can double check this now. One thing I did want to mention though is regarding the frames you can apply to your iWeb images. Be careful with the number of frames you use. You may be surprised to know that iWeb actually produces its own images to make up many of the frames with the majority taking up 8 separate images (one for each corder and one for each side). Thats nine images every time you add a photo with a frame to your iWeb site; no wonder they appear slowly.
A trick to get around this is to actually insert the image into iWeb, apply the frame in Inspector then take a screen shot (Shift+Cmd+4, then hit space and press the mouse). The screenshot will be copied to your desktop so open it in Preview and then tightly crop it. Save the image again as a JPG and give it an SEO friendly name. Go back to iWeb and delete your original image and drag/drop the copy back into iWeb; now you have an image with a frame but only made up of one image, and it has an SEO useful name unlike the names iWeb gives to its frame images (shape1.png, shape2.png etc).
So there we have it. A fully customizable CSS 3 and HTML based image viewer for our lovely SEO friendly images and not a bit of javascript in site. If you have any problems with the tutorial please leave a comment so we can all share, but I think I have pretty much covered everything in the instructions. Also, if you use this code on your iWeb site leave a link to it in a comment so we can all take a look.
Download the complete HTML Snippet code and instructions for the iWeb CSS3 Image Viewer here.


Comments